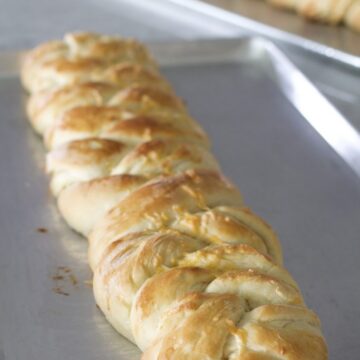
This Braided Cheese-Onion Bread has been a favorite recipe in our family for years! The chewy texture of the bread, combined with ribbons of melted cheese and onions all baked into one beautiful loaf is the perfect companion for almost any main dish.

A bread lover’s dream
I love almost any type of bread, sweet, savory, wheat, white, dense, light. The combination of the onions and cheese in this homemade bread are out of this world delicious! I like to use a bit of bread flour in this recipe to create a more chewy texture in the bread itself. The filling is really simple, it’s just melted butter with chopped raw onions and grated cheeses. The onions cook a bit in the oven so no need to pre-cook. When the bread is baking the aroma is unbelievable. It’s hard to keep the oven door shut and not peek!
I bake my Braided Cheese-Onion Bread on a jelly roll pan. I have several different types of jelly roll pans (aka baking or cookie sheets), but my favorite is this heavy duty USA Bakewear Jelly Roll pan. It is heavier than most jelly roll pans, which makes for better even baking and less of a chance to burn on the bottom.


Braids for days
I’ve heard bakers say braided bread is a lost art! I’m not much of an artist, but I can make braided bread. If you can braid your hair, you can make Braided Cheese-Onion Bread. This recipe consists of three ropes of filled dough, braided.
A couple of tips for easy handling of dough:
Tip 1- Make sure your dough is not overly soft. If the dough is sticky at all when you are finished mixing, it is too soft. The dough should not be shiny at all. If the dough is at all sticky, fold in a couple of tablespoons at a time until the dough has a matte appearance!

Tip 2- Don’t be afraid to handle the dough! This dough will not be damaged by handling. If the dough breaks apart when you are braiding or moving onto the cookie sheet, simple pinch the dough back together. Flouring your hands will also make the dough easier to handle. I like to brush the finished braid with a bit of beaten egg for a shiny finished texture, but it is not necessary.

I do not recommend buttering the outside of the dough! Buttering before baking will not brown up quite as nicely and there’s already plenty of butter and oil in the dough.
How to make chewy bread
To achieve a more chewy texture, I add 1 cup of bread flour to the dough. I’ve found that after making this bread for years if it’s made with only All Purpose flour, the structure of the dough is a little too soft to support all of the filling ingredients. I love the texture of ABK’s French bread and tried to make this bread in a similar way, adding bread flour and kneading to add a chewy texture.
Also, kneading the bread after all of the ingredients are added to the bowl also helps develop the gluten in the dough and will yield a more chewy bread. The original recipe called for about half of the ingredients in the filling with no grated cheddar. I knew that adding more filling and another cheese would make this bread over-the-top delicious!
 Braided Cheese Onion Bread – Any way you shape it, you’ll love it!
I usually try to keep the ingredients in this bread a bit under wraps when serving to kids. The first thing a kid does when they hear the “O” word is wrinkle their nose and tell you they don’t like onions. That said, I have yet to meet a person who does not love this bread. Kid, adult, young or old. Everyone loves Braided Cheese-Onion Bread!
If braiding is out of your comfort zone, try splitting the dough into two pieces roll out about 6×12 and then roll up as you would cinnamon rolls. Cut into 1-1/2 inch pieces and place close together on a greased cookie sheet or in a muffin tin for rolls that hold their shape easily!
The recipe will yield about 2-3 dozen rolls, depending on size of cut. I like to make rolls for luncheons where the tables are preset. If you are serving this at a table, or on a buffet, slice up about half of the bread (about 1 1/2 inch thick pieces) and leave the other half of the braid unsliced for presentation.
Leave the bread knife next to the bread so it can be sliced if needed. The bread may also be pulled apart and not sliced. Because the bread is filled with cheese and a little butter, no need to serve with any other condiments. Hope you love this recipe as much as we do!

Braided Cheese-Onion Bread
Ingredients
dough
- 1 tablespoon yeast
- 1/4 cup warm water
- 1 teaspoon sugar
- 4 cups flour, I use 3 cups all purpose, 1 cup bread flour
- 1/4 cup melted butter
- 1/4 cup canola, vegetable or a mild olive oil
- 1/2 cup milk (any type), warmed
- 1/2 cup warm water
- 1 tablespoon sugar
- 1 1/2 teaspoons sea salt
- 1 egg, beaten
- 1 additional egg for egg wash on top of braided loaf, beaten in a small bowl
filling
- 1 cup onion, diced fine
- 1/4 cup melted butter
- 1/2 cup freshly grated Parmesan cheese
- 1 cup cheddar cheese, grated
- 1 tablespoon poppyseeds, optional*
- 1 teaspoon garlic salt or 1 clove garlic, minced and 1 teaspoon salt
- 1 teaspoon paprika
Instructions
- In a large mixing bowl, mix yeast and 1/4 cup warm water. Sprinkle with 1 teaspoon sugar.
- Set aside until yeast begins to bubble.
- Add 4 cups flour, melted butter, oil, warm milk, 1/2 cup water, sugar, salt and egg to the bowl.
- Mix until all ingredients are incorporated. I use the paddle attachment on my Kitchen Aid for this step.
- When all ingredients are mixed and the flour is no longer visible, switch to the dough hook and turn on low for 2 minutes.
- Scrape down sides of bowl and spray sides of bowl lightly with cooking oil.
- Cover the bowl and place in a warm place for about 1 hour.
- Prepare the filling by mixing all of the filling ingredients together in a medium size bowl. Set aside.
- Flour a clean surface and remove the dough from the bowl onto the floured surface.
- Roll the dough out into approximately a 12×20 inch rectangle. You may need to add flour to the dough if it is too sticky. Just sprinkle on and fold into dough.
- Spread the filling onto the dough. With a knife, cut the dough lengthwise into three ling strips, approximately 4 inches each. You should have 3 strips of dough 4×20 inches when finished.
- Take each strip and pinch the dough together so the filling stays inside of the dough strip (see photos on post). At this point, you should have three long ropes of filled dough. Place each of the strips of dough onto a jelly roll pan that has been lightly greased or lined with parchment paper.
- Start with one end and begin to braid the bread, tuck the ends under.
- Brush with one beaten egg. If you don't have a pastry brush, use your hands to lightly coat the dough with the egg wash.
- Let rise in a draft free place for about 45 minutes.
- Preheat oven to 375 degrees and set the rack in the center of the oven.
- When braid has risen for 45 minutes, place in oven and let cook for about 35 minutes. The dough should be golden when done.
- Remove from oven and let cool at least 10 minutes, then slice and serve.
Notes
- You may use 4 cups of all purpose flour if you don’t have bread flour. The bread flour simply helps support the filling and creates a chewier texture.
- This bread may be made one day in advance of serving.
- The filling ingredients may be made early and refrigerated. Let come to room temperature before filling the dough.
Did you make this recipe?
Be sure to leave a comment and give this recipe a rating, letting me know how you liked it. I’d love to see a photo, tag @abountifulkitchen on Instagram!
Danielle Adams
Absolutely love this recipe. People always think it looks so fancy (but it’s so easy to make). And my house smells amazing!!
Rebecca Hatch
I love the cheddar cheese and onion combination. I have never made a braided loaf bread before and was so pleased when it turned out! Just delicious. I will be making this again.
ERica S
Thanks to the Great British Baking Show, I’m always interested in trying more elaborate bread recipes. This one totally delivers on taste while being quite straightforward to make! I love to pair this with the Panera Broccoli Cheddar soup.
Sue Cunn
I love savory and yeast bread. This is a wonderful recipe! I had leftovers and it even tasted great sliced and toasted in the oven. I’ve made it twice and the braid is beautiful and has different character each time. Yum!!!
Mark
Can you please add normal weights and volume to is.
Grams and mililiters?
Cups are unworkable.
Sabina Sambat
Hi! Can you help with adapting this for a bread maker on “dough” function? If I could let the mixer do all the hard work, kneading, and rising, I’d take it out at the end of the function and braid it with the filling…
John
What a tasty recipe and so easy to follow. First attempt to make flavoured bread and my wife (the family’s culinary expert) thoroughly enjoyed the flavour but a bit too chewy so I’ll add a little more flour next time to hopefully improve the texture. Thanks for a great recipe.
Jasmin Roussy
Found recipie confusing with amount of water to be added. Would be a lot more clear if wet ingredients were mixed together before adding to dry ingredients.
Si Foster
Hi Jasmin,
I noticed what you said about confusion with the amount of water and edited the recipe to specify the amount of water to be added in the instruction portion. Thanks for pointing this out!
xo
Si
Rachel
This is absolutely amazing! Added thyme and oregano to the bread and no paprika because I didn’t have any, but it is soooo good! Made this during quarantine and I’m all alone so I don’t have to share! 😂🤗 that may also be a bad thing 😂
Si Foster
I love those additions, Rachel, such a good idea, thank you so much for sharing!
xo
Si
Walt
The recipe is good! I followed it and the bread came out looking & tasting amazing. My wife had to help me braid it, but the whole family was impressed and enjoyed it. Thanks for posting it! (4/12/2020)
Si Foster
You’re welcome, Walt, I’m so glad you enjoyed the recipe, thank you for sharing!
Si
Maria Agosto
Can I prepare this bread the night before and bake it the next date?
Si Foster
Hi Maria, you should be able to prepare it the night before, then shape it, let it rise and bake the following day. Hope this helps and thank you for asking!
xo
Si
Linda Putnam
Beautiful and delicious and no changes for high altitude!
Si Foster
Thank you Linda! I live at about 4500 ft, and this recipe works at my altitude. For sea level and high humidity, I suggest a little less water and additional flour. Thanks for reading ABK,
XO
Si
Salena
How would I make this recipe without KA mixer?
Si Foster
Hi Salena,
just follow the directions and make in a large bowl. The dough takes up quite a bit of space in a bowl. Before I had a mixer, I just used a large bowl, a wood spoon and a bit of muscle! 😉
xo
Si
Tally Hansen
This recipe ticks all the boxes for me;
Easy to make- ✔️
Looks impressive- ✔️
Utterly delicious-✔️
Thank you ABK for helping me feel like a rockstar in the kitchen!
Ginger Smith
YUMMM! This was much easier to make than I thought it was going to be. It is SO yummy! Made it for my family and we all loved it! Will definitely be making this over and over again. Have you tried this with cinnamon roll filling? It seems it would make a delicious cinnamon bread. Thanks again for another awesome recipe!
Si Foster
You’re welcome, Ginger! I love how simple and easy this recipe is. I’m so glad you and your family enjoyed it. I haven’t tried it with cinnamon roll filling yet, but it sounds yummy. Thanks for sharing and for reading ABK,
xo
Si
TERRA SCHIMANKE
Would it be possible to omit the milk and use more water?
Si Foster
Hi Terra,
I haven’t tried omitting the milk and using more water. Milk creates a softer texture in bread and also gives it a richer flavor. Bread made with milk also browns better as it cooks. If you are adjusting to make this recipe milk-free, perhaps trying a nut milk will be a better option. Let me know how your bread turns out! Thank you for reading ABK.
xo,
Si
Gina
It says one tablespoon of yeast. Can I use dried yeast?
Will be making this tomorrow
Thx
Si Foster
Hi Gina, yes you can use dried yeast. Thanks for asking and for reading ABK!
xo
Si
Clarisa
Great recipe! It made one HUGE loaf! I used cheddar and gouda cheese because that’s what I had on hand. My husband said next time I should add some ground beef… 😉
abountifulkitchen
Hahahahha. Ground beef would definitely make this a MEAL in a loaf.
Thanks so much for sharing Clarisa!
xo
Si
Cassidy mickelsen
I made this loaf tonight to go with a salad and it was amazing! I sprinkled the poppy seeds on the outside on the egg wash and it gave great texture. Thank you for the recipe!
Si Foster
Oh great idea! The poppyseeds on the outside would be so pretty!
I think I will try that tonight when I make this. Thank you Cassidy!
xo
Si
Si
Katie, I LOVE that you are a young person, and you are cooking!
Katie
Si, I made this bread on Saturday and I think my husband thought I bought it at the store. It turned out amazing! Thanks so much for posting this!
Diane
Si, will you please adopt me? I promise I will make a great daughter. I will even wash all the dishes without being asked or complaining. Please, please, pleeeeese!
Si Foster
Diane,
YES! The dish washing promise is what sold me <3 😉