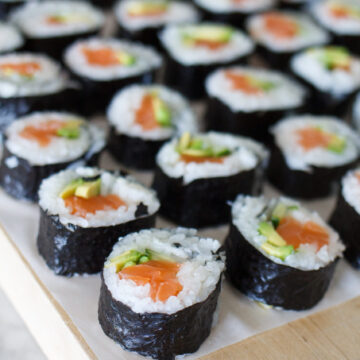
If you have always wanted to make sushi at home, I have just the recipe for you! My recipe for simple sushi can be made as individual maki rolls or you can set out all of the ingredients and let guests create according to their preferences.
Let’s talk basics before we get started. The who, what, why of this classic Japanese dish…
What is the difference between sushi and sashimi?
For starters, let’s clarify the difference between sushi, maki, nigiri and sashimi. The term “sushi” is actually rice, flavored with rice vinegar.
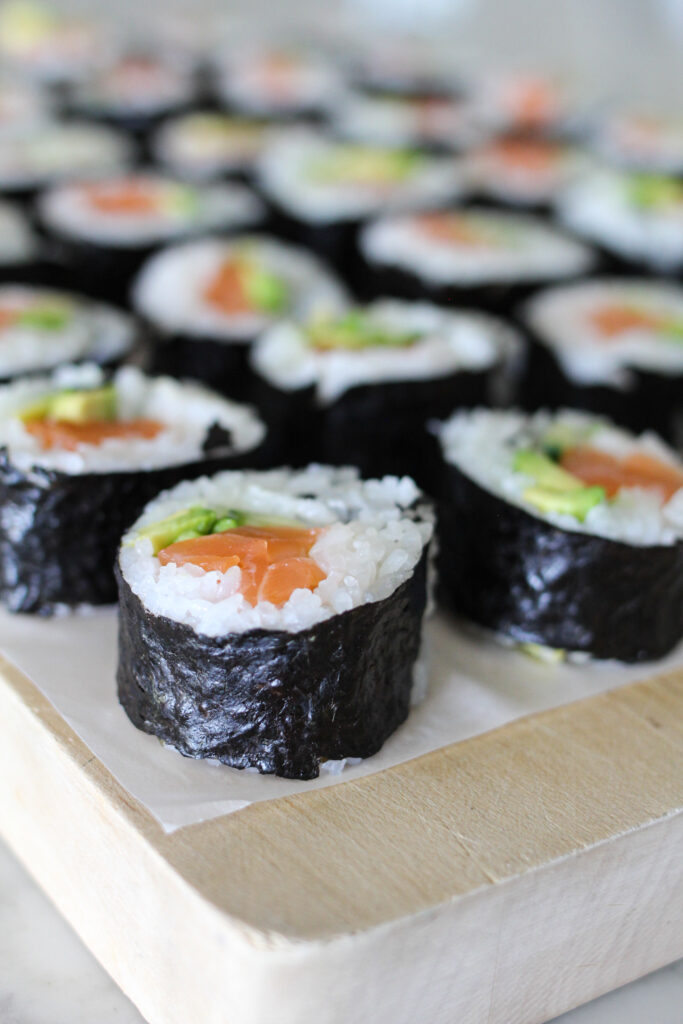
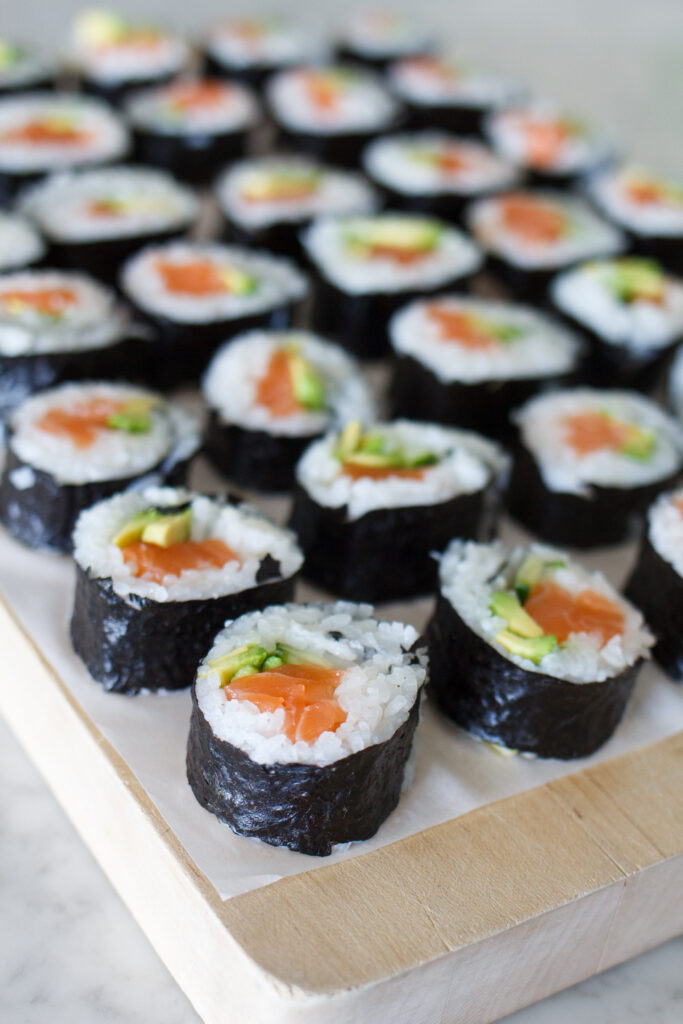
Maki usually consists of fish, vegetables and rice rolled in a seaweed (nori) wrapper, then sliced. Maki can include countless combinations of raw fish, tempura (battered and fried) shrimp, crab, etc, also raw vegetables, egg, fruit, and even cream cheese.
Nigiri is usually made up of a little mound of rice seasoned with rice vinegar (prepared sushi rice) formed into a rectangle (flat or mounded on top) and then topped with a slice of fresh fish or other seafood.
Sashimi is simply fresh fish, sliced, served raw. Many people mistake sushi for sashimi and say they don’t care for sushi, when they really mean they don’t like sashimi.
What is in sushi rice?
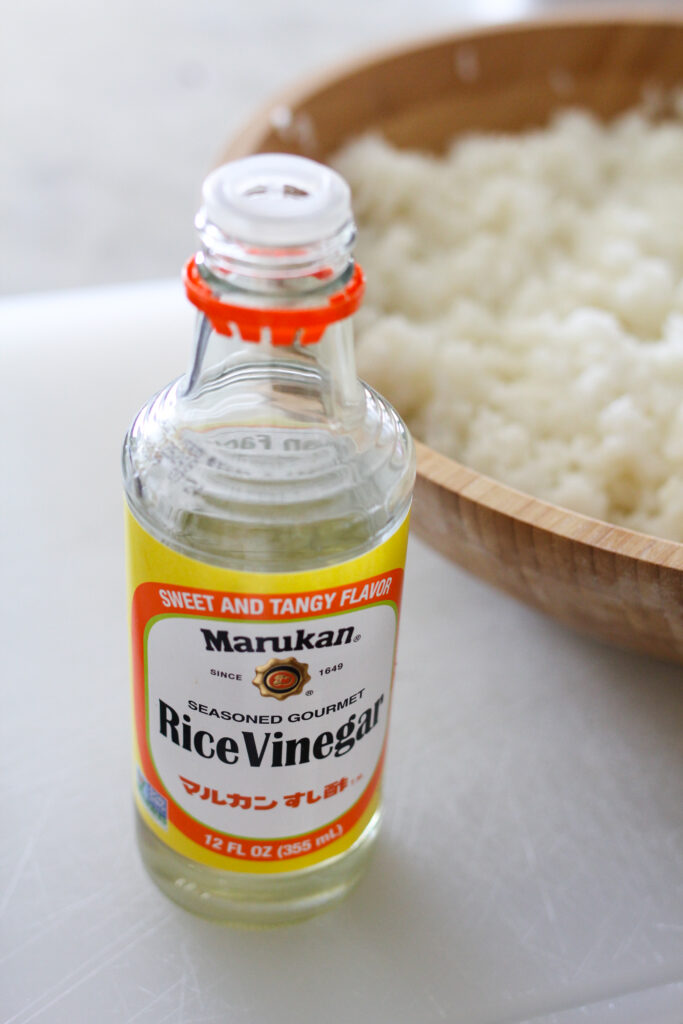
Sushi rice consists of Japanese short grain rice, often called sticky rice, cooked and mixed with rice vinegar. I like to use a rice vinegar that has already been sweetened, which eliminates the need to add extra sugar to the sushi rice. Seasoned rice vinegar usually includes sugar, salt and a bit of water. My favorite brand sold in most US grocery stores in Marukan. Look for the orange label.
What type of rice is used in sushi?
Rice vinegar is essential in making sushi. It’s the glue (maybe a bad analogy) that makes everything come together in this crave worthy recipe! Japanese sticky rice is also essential. Do not use long grain rice. Do not use Minute rice. Look for short, plump grains of rice. I have bought Calrose brand rice for years. It’s the same brand my mom bought when we were growing up. It used to be found only in Asian grocery stores. Now it is sold in almost every grocery store.


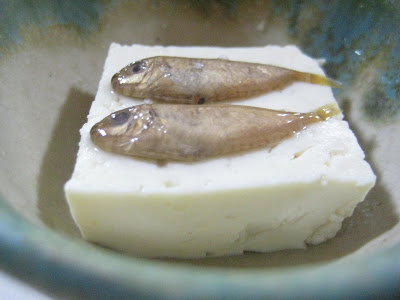
Some of the photos in this post are from 2008 when I traveled to Okinawa, Japan to visit family. Most of my relatives speak about as much English as I speak Japanese (very little). I watched carefully as my cousin Kaori and her sisters-in-law prepared a huge meal. Sushi, soba, shrimp rolls, salad made with Goya (a weird, bumpy green veggie found in Okinawa) and many other types of speciality dishes.
 Feast prepared by my cousins and other family
We ate and laughed and I realized then, more than ever before, how food unites us. Sharing meals and cooking together can bridge language barriers we have- kind of like smiles.

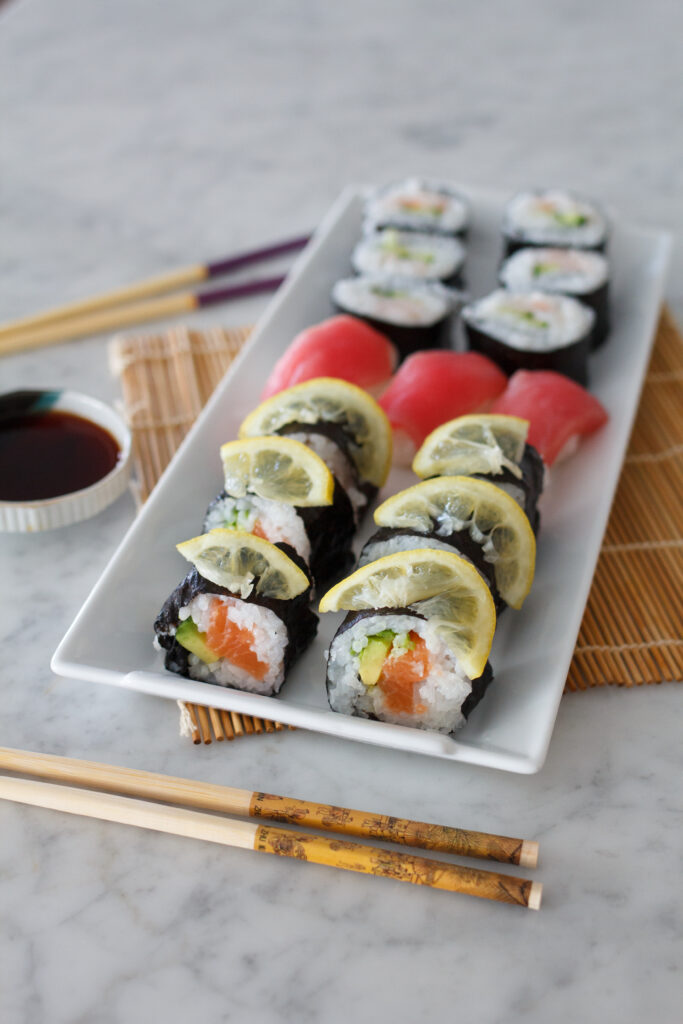
I love the way they served it on a big platter with all types of fillings. Every year on Christmas Eve in our home, we make sushi with my mom. We started this tradition when our kids were young to preserve our Japanese family heritage. We make sushi and tempura, and my mom always makes her famous fried rice (even though fried rice is Chinese). We usually make individual maki rolls with nori, fish and vegetables. The buffet-style method is much easier and allows everyone to build their own roll. Just spread the seasoned rice over the seaweed, top with your favorite raw fish, shrimp, vegetables, fold over. and enjoy! They don’t even slice it. Just wrap and eat.
 ramen in broth
 The national vegetable, Goya. Eaten in salads, stir fry, deep fried.
The key to making sushi at home
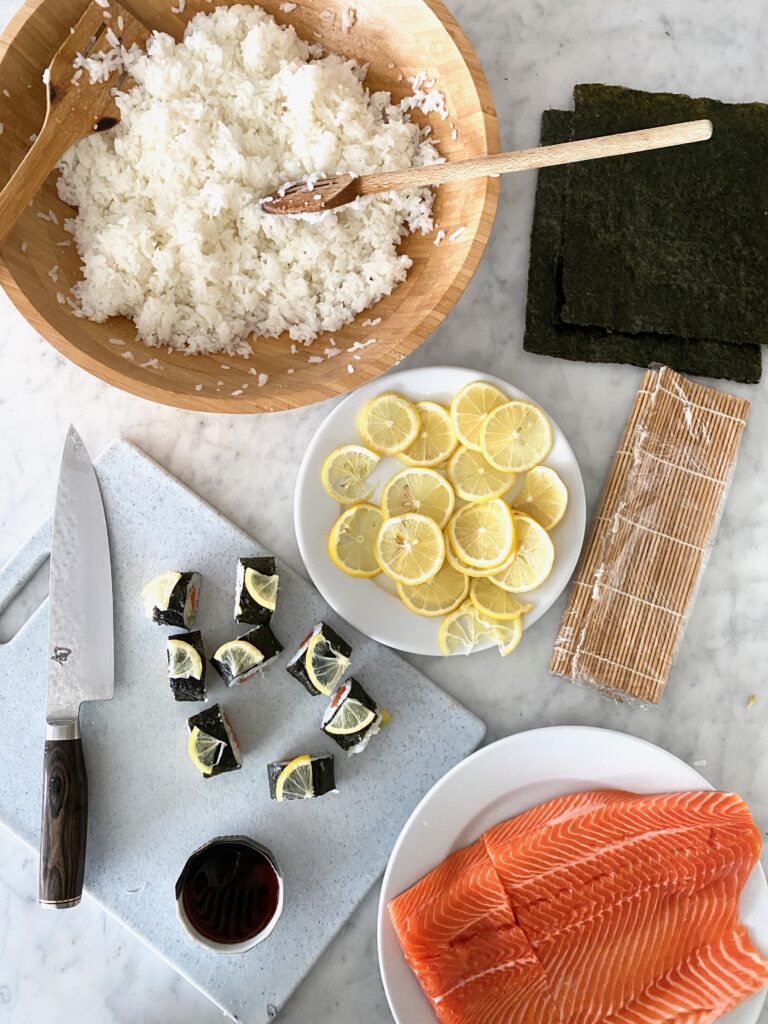
In my opinion, the key to having a good experience making sushi is preparation. Cut the veggies, fish and any other fillings for sushi ahead of time. The rice can be made a day ahead and mixed with the rice vinegar if necessary (see recipe notes). Sushi is basically seaweed, rice, fillings and condiments (soy sauce, ginger and wasabi). It’s a very simple process.
Once you get the hang of rolling sushi, I think you will love it! Gather your friends and family and some fresh ingredients and get creative in the kitchen. I’d love to hear about your sushi making experience in the comments below!
Simple Sushi recipe originally posted in October 2008, updated with new content and photos July, 2022
Simple Sushi
Ingredients
- 7-8 cups white sticky rice, cooked, hot
- 1/2 to 3/4 cups rice vinegar
- Nori seaweed dark green or black, in sheets
- assorted filling ingredients – avocado, cucumber, carrot, scallions, mushrooms dried or fresh, fresh lemon sliced, assorted raw fish sliced thin or shrimp
- Soy sauce, pickled ginger and wasabi
Instructions
- Cook the rice according to directions. Let the rice sit for about 10 minutes after cooking is complete.
- Meanwhile, prepare all vegetables and fish for making sushi. Place plate or platter of fillings close to the assembly area.
- While the rice is cooling, Cover the rolling mat with plastic or Saran Wrap for easy clean up!
- When rice is ready to use, fold the rice in the cooking pot so the rice on the bottom of the pot is on top and the top layer is on the bottom of the pot. Do not smash or stir the rice. This prevents the rice from forming a yellow or brown layer on the bottom.
- Spoon the rice into a large bowl, preferably wood or a shallow bowl to let cool a bit. While the rice is still warm, sprinkle the rice vinegar over the warm rice and continue to fold until the rice vinegar is evenly distributed.
- Place a sheet of seaweed (nori) on top of the bamboo rolling mat, shiny side down. To make maki roll, use a silicone spatula or clean, wet hands to gently spread a thin, even layer of rice over the seaweed. the layer of rice is usually about 1/4 inch thick. Leave a 1/4 inch border around the edge of the seaweed all the way around.
- Place cut up fish, vegetables or other fillings in the center of the roll, in a long thin line.
- Lift the end of the mat, and gently roll it over the ingredients, pressing gently as you roll. Roll it forward to make a complete roll. Repeat with remaining ingredients. Cut the rolls into 6-8 pieces per roll. Serve on a platter with pickled ginger, wasabi and soy sauce.
- To allow guest to make their own rolls buffet-style: Stack seaweed sheets (nori) next to the rice, alongside the veggies and fish. Let each guest spread the sea weed wrapper with a thin layer of rice, then top with fillings.
Notes
- for 7-8 cups rice, I use about 1- 1.5 lbs fish or shrimp combined. 1-2 lemons, sliced, 1/2 cucumber, one carrot, 1 large avocado.
- Prepare all ingredients while the rice is cooking.
- Brown rice does not form a firm roll. The flavor of the brown rice does not complement the fillings. White sticky rice is best for sushi. We like the Calrose brand, found at most grocery stores.
- Sushi tastes best right when you make it. If you have to refrigerate, let it warm up to room temperature before eating for best flavor.
- If making the sushi rice a day ahead, follow directions to cook rice and fold in rice vinegar. when completely cool, seal in an air tight container or I like to wrap the rice in plastic wrap. Leave on the counter top at room temperature (do not refrigerate) and use within 24 hours.
- Extras-must haves – Wasabi, soy sauce in small bowls for dipping, pickled sliced ginger, ohashi (chop sticks).
- To make this dish more budget friendly, coordinate with guests and have everyone bring 1-2 fillings, you provide the nori, prepared rice, supplies and condiments (soy sauce, ginger and wasabi).
Equipment
- bamboo mats for rolling sushi, plastic wrap
Did you make this recipe?
Be sure to leave a comment and give this recipe a rating, letting me know how you liked it. I’d love to see a photo, tag @abountifulkitchen on Instagram!
ELYSE LAMOREAUX
My kids love sushi so I thought it would be fun to have a sushi day with them. They helped me shop for all the ingredients and had so much fun picking out what they wanted to put in their own sushi rolls. They turned out wonderful and it was a memory we’ll have forever! Might make it a monthly thing!! (YUM!)
Peyton
My family loves sushi! We make it at home but usually stick to just veggies or cooked shrimp as fillings. How do you choose fish to use? Just any fish from the grocery store or do you go to a specialty store to get fish specifically for sushi?
Katie
Yes! This question! My kids love making homemade sushi but we usually stick to California rolls as I’m nervous about the fish. Would love to know what she suggests!
Si Foster
Peyton, I took a series of sushi classes years ago from a local sushi chef Jonas Otsuji. I asked Jonas about the best place to buy fish in SLC. He told the class he often buys fish at Costco because they seek a lot of fish and it’s likely the fish will be fresh. I have had good luck with purchasing fish at Harmon’s and Smith’s as well. Unless you live on the coast, all fish is previously frozen. Smell the fish before buying at the grocery to make sure the fish does not have a strong or “off” smell.
Let me know how it goes after you make it!
Si
Haylee
Si, what is your family’s name in Okinawa? My husband served his mission Japan, and thinks your family was in his ward! Crazy! What a small world! I love your blog! You are amazing! Keep up the good work!
Haylee (Hodgkinson) Gunnerson
barbyb
Those pictures, and that recipe — it is all really amazing. I love seeing your family in Japan. I love seeing the AUTHENTIC, cooked in a home, Japanese food. I love thinking, “. . .hmm. . .maybe I could even do that myself. . .” Thanks, Si!