Every Easter and Christmas, my mom topped her ham with a Pineapple Brown Sugar Ham Glaze. I can’t imagine eating holiday ham any other way! After baking ham for years, I’m going to share a few tips for the perfect holiday baked ham.

The holidays would not be the same without my Mom’s ham and Pineapple Brown Sugar Ham Glaze. Every Thanksgiving we had roasted turkey, and every Christmas Mom served ham. I love the sweet and slightly sticky glaze and the way it compliments the flavor of the ham. This glaze is easy to put together, it requires a pan, whisk and about 5 minutes. Your 8 year old can whisk this together for you while you watch!
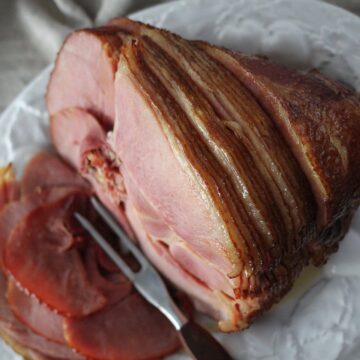
Ham is best served with a baked on glaze. Oh, and about the glaze packet inside of the package of ham? Toss that directly into the garbage, and gather the ingredients for Pineapple Brown Sugar Ham Glaze. In a few minutes, you’ll have the best and most simple glaze ready to pour on your ham! Mom used to place pineapple rings on the ham using toothpicks to secure the pineapple, I skip that step, but if you like pineapple pinned to your ham, pin away!

Tips for the Best Spiral Baked Bone-In Ham:
- I like to purchase bone-in ham for baking. Back in the day, my mom always bought a ham shaped like a large egg. A ham with a bone-in insures your ham is a real ham, not a pressed together piece of pig and pig “parts”. I often purchase my ham at Costco or my local grocery store. Bone-in hams have the best flavor!
- Let the ham sit on the counter for at least an hour before baking. I like to take it out 1 1/2 hours ahead of baking time. This is an important step! If you take the ham directly from the fridge to oven, it will need an additional hour in the oven to heat completely, which tends to lead to a drier ham. I cannot stress this tip enough.
- Turn oven on for at least 30 minutes before placing ham in oven.
- Using clean hands, fan out the spiral cut pieces a bit, this will help the ham heat up more evenly and also absorb the delicious glaze!
- Bake at two different temperatures for most juicy meat! First, at a low temperature to heat up while sealed tightly with foil.
- Second bake, for an hour without glaze, covered, then glaze and remove the foil covering so the glaze has a chance to caramelize just a bit!
- Use the heaviest pan you have, or if you’re using a disposable aluminum pan, place a jelly roll pan or cookie sheet underneath to ensure your ham doesn’t get scorched on the bottom.

Pineapple Brown Sugar Ham Glaze
Ingredients
- 1 (3-7) pound cooked, sliced, bone-in ham
- 1 cup pineapple juice
- 1 3/4 cup light brown sugar
- 1/2 cup orange juice
- 1 teaspoon prepared mustard, yellow or Dijon smooth
- 1/2 teaspoon ground cinnamon
Instructions
- Take ham out of refrigerator, completely unwrap packaging and discard. If there is a piece of plastic over the end of the bone (bone guard), discard.
- Let ham sit on counter for 1-1 1/2 hours in a heavy baking pan before baking.
- Thirty minutes before baking, place rack on lower 1/3 of oven and turn oven to 275 degrees.
- When ready to bake, place 1/2 cup water in bottom of pan, cover ham with foil and tightly seal edges of foil to pan.
- Bake for 10 minutes per pound.
- Gather glaze ingredients while ham is baking, whisk together in a pan and cook over low heat until sugar is dissolved or the glaze is bubbly (about 3-5 minutes). Set aside until ready to brush onto ham.
- When ham is heated, remove ham from oven and turn heat to 400 degrees.
- Remove foil from ham and discard any liquid left in pan by spooning out or using a bulb baster.
- Brush or spoon glaze over ham and return to oven for 10-15 minutes or just until glaze is bubbling a bit. When removed from oven, brush additional glaze on ham.
Notes
- Before discarding packaging, look to see how many total pounds of ham in package, so you can bake accordingly.
- The ham may be cooked either cut side down, or with the cut side exposed. If cooking on the side, use toothpicks to help keep end piece from separating and drying out. Remove toothpicks before serving.
- Important to remember the ham is already cooked, you are simply warming the ham and glazing before serving.
Equipment
- 1 heavy baking pan with sides
Did you make this recipe?
Be sure to leave a comment and give this recipe a rating, letting me know how you liked it. I’d love to see a photo, tag @abountifulkitchen on Instagram!
Sal
Should I put the ham on the rack that goes inside my roasting pan, or just directly in the pan and in the 1/2 c water?
Si Foster
Hi Sal,
Place the ham in the pan, not on the rack.
Happy Holidays!
Si
Liz
Can you tell me if this works cooking the ham in a slow cooker? My oven will be pretty full cooking other dishes.
Si Foster
Hi Liz!
Ham may be cooked for 3-4 hours on low in a Slowcooker. Place the ham largest side or flat side facing down.
Use the same glaze, boil then. Pour over the ham. If the ham is too tall for the Slowcooker, cover the ham with foil and seal to edges of Slowcooker.
Happy Holidays!
XO,
Si
Nan Edwards
I love ham! Every year I make it for Easter and Christmas but i never seem to get it right, until I found your recipe! I followed it step by step and my ham came out perfect!!!!!! I was so happy!! Thank you!!!❤️
Marie
This ham recipe has become my go to recipe. It just can’t be beat and turns out perfectly every time!
Clara
I needed an idea for Christmas dinner. For the first time we were not going to be with extended family. This recipe was easy to prepare and so delicious. The ham was very flavorful and moist. It was a lovely Christmas dinner.
Sara
Hi Si! What do you use to slice your ham so thin?
Melissa Brooks
Great cooking tips and the glaze was fantastic. Happy Easter!
Fatima
I made this for Christmas Eve and it tasted so good!! My kids were licking their fingers and I’ve never seen them eat so much ham!! Super easy instructions and for the first time the ham wasn’t dried up!!!! Also the glaze really did take a couple minutes to make! Definitely doing this again 🙂 thank you!
Kim
Sooo good! My mom put me in charge of the ham this year and her only request was to not use the glaze it came with. I remembered seeing Si post this recipe so I looked it up and decided to go for it. It was SO easy! The instructions were easy to follow/understand and I will definitely be using it again. My family loved it and I know it is all because of this recipe. (I didn’t add the mustard or cinnamon)
Morgan
I am 23 years old and a total cooking newbie! But I made this recipe for Easter to try to impress family, and oh my goodness did it work! It was SO delicious, moist, and easy to make. I wrote this recipe down in my journal to make sure I never lose or forget it. I’m making this exact ham recipe every single year. Thank you so much ABK.
Jeanelle
I was thinking ahead to Easter today and thought “I wonder if Si has instructions for ham” because I always seem to cook a dry ham. I read through your instructions and I think I’ve got it figured out now, thanks to you! I’ll come back after and let you know how it turned out!
Nicole
I’m excited to try this out. I think this might be my first ham? Usually someone else makes it 😉 I wanted to try a slow cooker, but my ham is too tall. This sounds great! Thanks for the extra tips. I wouldn’t have thought to let it sit out first.
Si Foster
Nicole,
How did your ham turn out? I hope your Easter was delicious and enjoyable! I hope my tips helped.
Thanks for reading ABK.
xo,
Si
Steffanie Clark
Can’t wait to make this for Easter. Your glaze sounds delicious!
Barbara Hartmann
Do you usually buy a spiral cut ham? Also, do you have a favorite brand?
abountifulkitchen
Hi Barb,
I often purchase a spiral cut ham. We like the Costco brand, it is a good quality ham, and with a good glaze is really tasty! If you have the budget, I highly recommend the Snake River brand Hams. They are the best I have ever tasted! Shipped frozen, they need to thaw a couple of days before cooking. Happy holidays!
xo
Si