This is no ordinary Banana Pudding! It’s the original recipe from the famous Magnolia Bakery in New York City. The Magnolia Bakery Banana Pudding Recipe is creamy and light and filled with just the right amount of Nilla Wafers and fresh bananas. And it’s one of the easiest and most delicious desserts you will ever make!

Magnolia Bakery Banana Pudding Recipe
This isn’t a copycat, but Magnolia Bakery’s original recipe for their banana pudding. If you’ve been to New York, and you love food, you’ve probably been to Magnolia Bakery.
Magnolia Bakery also has locations in LA, and Chicago as well. While Magnolia Bakery is famous for their cakes and cupcakes, I think the best item sold in the bakery is their banana pudding.

It’s made in a huge container and then scooped out and put into their cute paper cups for serving. I love the original banana pudding and the chocolate version as well! Utah is a long way from NYC, so enjoying banana pudding from Magnolia doesn’t happen often enough.
The options for getting a taste of New York in Utah comes two ways. One, order a batch of pudding delivered to your door for $100. Yes $100 for about 10 servings. Not bad if you consider most desserts at restaurants cost between $6-$10, but not really affordable for most folks.
Option two, make the banana pudding in your home, with fresh bananas, cream, pudding and wafers for about $1-$1.50 per serving. And you’ll have the bowl and beaters to lick (no charge)!
The Best Banana Pudding
This banana pudding outshines my mom’s banana pudding by a landslide. Don’t tell my mom! She made banana pudding for us growing up, probably the way most of your moms made banana pudding, and the way I made it, before I knew better. A box of Nilla Wafers, a box of banana pudding (banana flavor) Cool Whip, and of course, bananas!

This recipe uses the Nilla Wafers, but that’s about the extent of the old version. The Magnolia Bakery Banana Pudding Recipe incorporates a can of sweetened condensed milk, fresh whipped cream, bananas and cookies. So simple, and so good.
I can’t really imagine a person in their right mind not loving this dessert. Every time I serve it, this is the conversation that follows… “What is this??” “This is SO GOOD” “This is probably really bad for me” “Can I have the recipe?” and “This is the best banana pudding ever!”

Banana Pudding, a few essential tips for success
Five essential tips for making the best banana pudding on the earth:
- First and probably most important tip, (besides making sure you have purchased all correct ingredients) is to PLAN AHEAD. The success of this dessert depends on planning ahead. You need a full 3-4 hours for the pudding to set up properly. Make pudding as directed in recipe, then let sit in fridge. You can do this up to two days ahead of assembling dessert. You also need to allow an additional few minutes to assemble the dessert and another 4-8 hours to set up before serving. I have served this at the 4 hour mark, 6 and 8 hours after assembling and I think 6 hours is the perfect amount of time for setting up.
- Buy bananas that are slightly green. No old bananas. Those are for banana bread, not banana pudding! The slightly under ripe bananas are perfect for this dessert. Make sure the bananas are almost ripe, not bright green! Many people brush the bananas with lemon juice or “fruit fresh” to keep from browning, but I have found using slightly under ripe bananas and serving within 6 hours of assembling keeps the bananas looking fresh. I also make sure to completely cover the bananas with pudding. This helps the browning from happening too quickly.
- Purchase the right ingredients. Regular– (not low sugar or low fat) pudding mix, whipping cream, sweetened condensed milk, and cookies. The success of the dessert depends on it. Too often, I have readers tell me they have made a recipe and followed the directions exactly and had a fail. When I drill down the ingredients I usually find they substituted margarine for butter, or stevia for sugar, or used low fat cream cheese instead of regular cream cheese…all of these substitutions seem insignificant, but when a recipe fails, it is often traced back to improper ingredients used or simply not carefully following directions. This recipe is, dare I say…foolproof? It is very simple. Just make sure you use the ingredients called for!
- The set up time of the finished desert is critical. If you’ve ever eaten Magnolia Bakery’s Banana Pudding, you know the cookies absorb the pudding and bananas and almost become ONE. Meaning, the dessert is best when the flavors and ingredients have a chance to meld together into one soft, fluffy mouthful of creamy goodness. This won’t happen if you make the dessert, assemble and serve too soon. 4 hours is minimum, 8 is maximum set time.
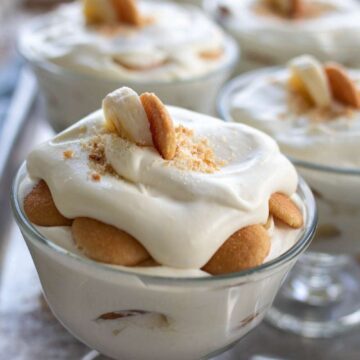
- Wait to top the banana pudding with any fresh bananas until just before serving for best presentation!

Magnolia Bakery Banana Pudding Recipe
Ingredients
- 1 14 oz can sweetened condensed milk, NOT evaporated milk!
- 1 1/2 cups cold water I use cold bottled water from fridge
- 1 3.4 oz (small box) Instant Vanilla Pudding (make sure it is INSTANT), I like Jello Brand "Instant Pudding and Pie Filling" mix sold in a box
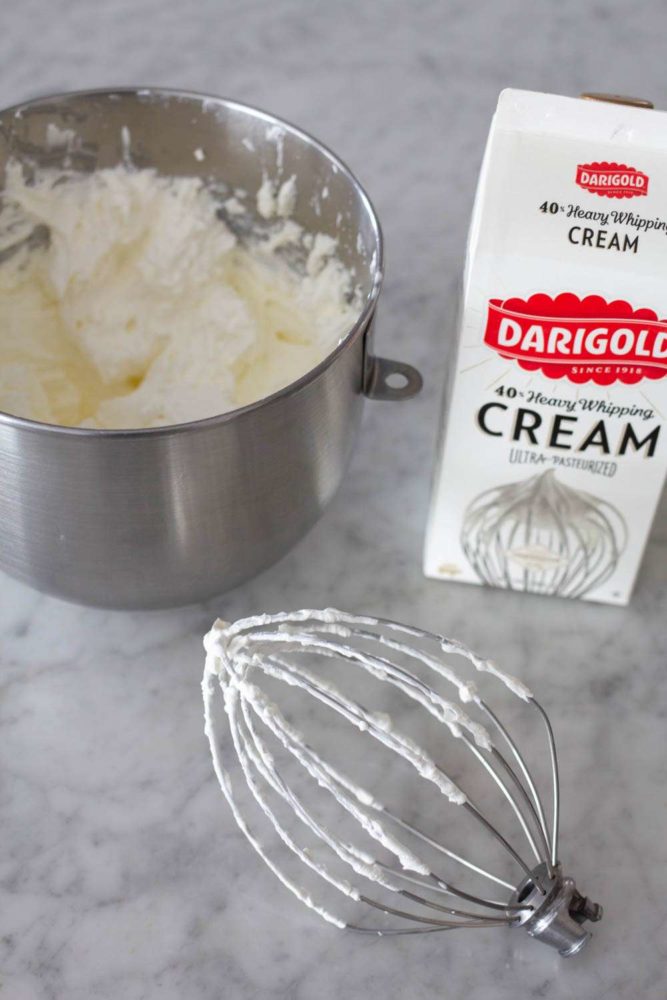
- 3 cups good quality heavy whipping cream, shaken, I use Darigold or Winder Dairy
- 4-5 cups slightly under-ripe bananas, sliced (about 5 large bananas), bananas should be slighly green (not bright green!)
- 1- 12 oz box Nilla Wafers regular or mini size, reserve some for crumbling on top and placing on top of pudding
Instructions
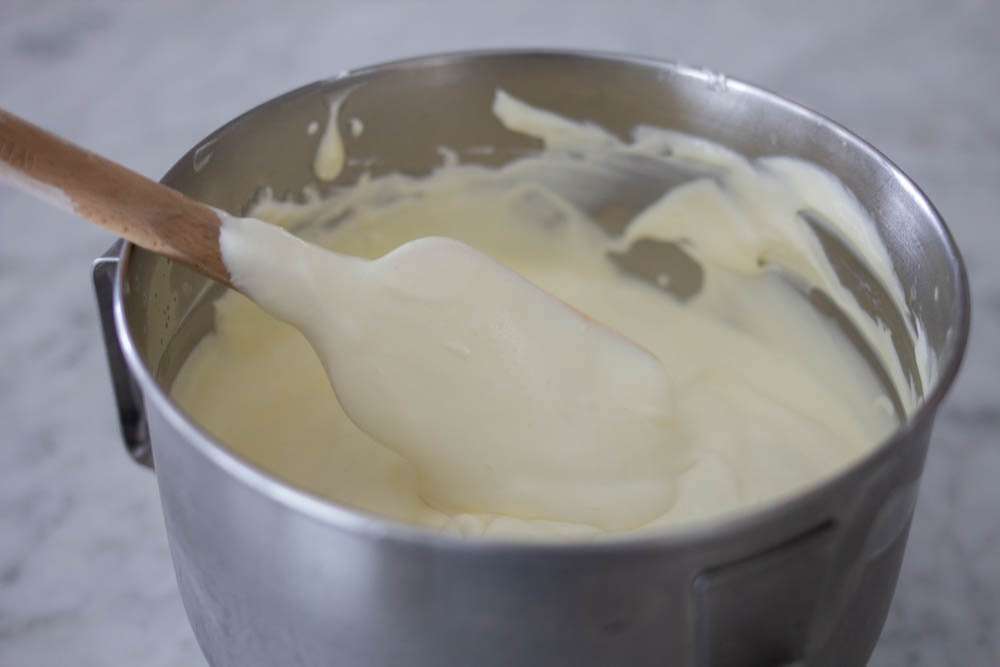
- In the bowl of a stand mixer or a large bowl whisk together the can of sweetened condensed milk and 1 1/2 cups cold water until combined.
- Add the pudding mix and beat with a whisk or the whisk attachment. The mixture should be smooth and all pudding ingredients dissolved.
- Cover and refrigerate for 2-3 hours, overnight, or up to two days ahead of serving. Make sure to allow the pudding enough time to set up.
- In a large bowl, or the bowl of a stand mixer, whip the heavy cream in a clean bowl for a few minutes (this takes about 3-4 minutes in a stand mixer on high until the cream is stiff.)
- Using a rubber spatula, fold the whipped cream into the set up pudding mixture until no streaks of pudding remain. Don’t beat with a mixer; gently fold mixture so the cream doesn’t deflate! You may use a large whisk and whisk by hand.
- To assemble dessert, use a large glass bowl, trifle bowl, 9×13 pan or 10-20 4-8 oz cups
- If making in small individual containers, I like to use a 1/4 cup measure and place pudding in the bottom of the bowl or cup first, then layer sliced bananas and a layer of cookies. Repeat and end with a little pudding mixture on top. Cover and let chill for 4-8 hours.
- When ready to serve, slice a few bananas and place a Nilla Wafer or crushed wafers on top of each serving if making individual portions. If making in a bowl, arrange in three layers and end with either wafers or pudding on top.
Notes
- PLAN AHEAD. You need a full 2-3 hours for the pudding to set up properly. You can do this up to two days ahead of assembling dessert. After allowing the pudding to set up, you’ll need another 4-8 hours for the assembled dessert to set up properly. I think 6 hours is the perfect amount of time.
- Buy bananas that are slightly green. Make sure the bananas are almost ripe, not bright green! I received several messages regarding the ripeness factor of the bananas when I posted the original Magnolia Bakery Banana Pudding. I understand a riper banana will yield a sweeter banana, but I’d rather have a firm banana that is not discolored than a sweet soft (and eventually slimy) banana in my dessert!
- Purchase regular pudding, whipping cream, sweetened condensed milk, and cookies. The success of the dessert depends on it. No low fat or low sugar ingredients/versions of the listed ingredients.
- If you are topping the dessert with fresh bananas, wait to top the pudding with bananas until just before serving!
- If you are making this for a party, and would like to make individual servings, the recipe yields about 10 heaping 1 cup servings (quite a large serving), or about 18-20 1/2 cup servings. I suggest the smaller version for most occasions.
Did you make this recipe?
Be sure to leave a comment and give this recipe a rating, letting me know how you liked it. I’d love to see a photo, tag @abountifulkitchen on Instagram!
Cherie
Thank you for sharing your amazing recipes! I made this for a friend from the South as banana pudding is her favorite! This was sooooo good! Rave reviews from all, and today I think I might make a batch of the pudding just for myself! I couldn’t stop eating it!
Si Foster
Cherie!
Sounds amazing! I’m so happy it turned out great and everyone enjoyed it.
XO,
Si
Melissa L
This pudding is delicious and your instructions are so thorough. Thank you!
Debbie Lewis
Perfection! I made this for a funeral medal and everyone wanted the recipe!
Kiersten Nelson
This is the banana pudding of my dreams!
We lived in NYC for a summer and I am embarrassed to admit how often we’d get banana pudding from Magnolia Bakery. There was one right by my husband’s office, and we’d either get it together or he’d bring some home. If you’ve never tried it, you may be wondering if banana pudding can really be that good, and yes, it absolutely lives up to the hype!
This recipe is a very close second! Honestly, if I ate it in a Magnolia Bakery cup in NYC I may not even know the difference. You do need to plan ahead but it’s 10000% worth it. And I agree, 6 hours is the perfect time to let it set before serving!
Carolyn Larsen
One word says it all … YUM!!!
Lena
I love this recipe so much, i have made it for my birthday, my daughter in law loved them so much we made them for her baby shower dessert table. So good!
Makalita Lasukau
Mother’s Day staple. A rewarding dessert for such a special day. Love this recipe means so much more.
Amber
This recipe is just like the original! It’s a family favorite and always a crowd-pleaser.
Theresa
My hubby absolutely LOVES this recipe of Banana Pudding! Thank you very much for sharing it with us all
It’s Super easy to make with most ingredients being in our cupboards. The hardest part for me was trying to remember has it been 6 hours yet? Lol.
Today I’m going to try to ” switch it up”. I’m using pistachio pudding mix , shortbread cookies & no fruit. I’ve not assembled it yet. I’m hoping it’s as delicious your Banana Pudding.
Thanks again
Si Foster
Theresa, So glad you enjoy this recipe. I agree, the waiting is the hardest part lol. Let me know how it goes using the pistachio pudding mix- sounds like it would be delish! Thanks for reading ABK!
XO
Si
Mike
Game changer. I added a half a cup of rum Chata in place of a half a cup of water. Unbelievable. People are freaking out over it! Thank you!
Erika
Absolutely delicious! Made this with my boys today and it did not disappoint.
Si Foster
Hi Erika!
I’m so glad your family loved this banana pudding recipe. It’s always great to hear about families cooking together in the kitchen. I love how creating and eating food brings us together and makes great memories! Thanks for reading ABK.
xo,
Si
Bella
I’m all the way in the U.K. and special ordered Nilla Wafers as well a instant vanilla pudding mix just for this recipe. Thank you.
Si Foster
Hi Bella,
Wow, That is commitment! I hope you love this recipe. I’d love to hear how it turns out for you!
xo
Si
Min
Hi Si! Thanks for sharing this recipe! It looks so so delicious but the Jell-o brand pudding is hard to come by where I live. Have you tried any other alternative puddings? Is there a particular type of pudding I should look out for? Thanks in advance!
Si Foster
Hi Min,
Hmmmm. Jello Brand is preferred, because I’m familiar with it, but if you live where another brand or even store brand is sold, try that. Just make sure it is Instant, and not the cooked variety!
Let us know if you try this!
xo
Si
Regina M Robinson
It’s literally heavenly.
Caryn
I’ve never been to a Magnolia Bakery as none are nearby, but have always wanted to try their famous banana pudding. (Mostly just to see what all the hype was about!) I will be trying this recipe but am curious to know does it REALLY taste like their store bought pudding for those who have eaten it?? I know it’s their recipe but is it THE recipe? Based on the ingredient list it seems to be a whipped dessert more so than a pudding. Jello calls for just two cups of milk per pudding box, this recipe is nearly two cups of sweetened condensed milk, water and then three additional cups of cream! So are we eating bananas and whipped cream essentially? Just curious the thoughts of those who’ve eaten Magnolia Bakery’s pudding.
Jess
Is it possible to make a smaller batch? Such a large quantity of me and my hubs alone
Si Foster
Hi Jess,
Yes, you can make this as big or small as you’d like. If you have a kitchen scale, just half or 1/4 the amount of pudding and adjust the rest of ingredients accordingly. Hope this helps!
Si
Ali
Where is the recipe? I can’t find it!
Si Foster
Sorry Ali! I inadvertently deleted it but it is back up now! Thanks for the heads up!
xo
Si
anakonda
Absolutely the best, most authentic recipe!! My son adores banana pudding, and this recipe wins over any other out there! Thank you so very much for saving us lots of money ordering from Magnolia bakery itself! Have you seen the prices there? Crazzzzzy and not worth it, because I think this recipe is a favorite by all! We froze the left over whipped cream, as ice cream – like suggested. And it is very creamy as well! Gave some to a neighbor who loves anything banana… and he went “bananas!” with this one. He said it was the best ever!
Well, making it every other weekend now. Have a wonderful holiday season and thank you so very much again! XOXO
Chelle Thompson
This is hands down the BEST banana pudding ever! I served it to guests and wish I’d taken a photo but we all scarfed it down too quickly! One person even went for thirds.
Si Foster
Chelle,
Wow, thank you so much. I have to agree! It is a dessert I can’t have sitting in the fridge or I will eat the entire bowl in a couple of days. And bless that person who went for thirds!
xo
Si
anakonda
I completely agree Chelle! Same here. Have been making it every other weekend and can’t wait for visitors to come to the house (when all this crisis is over!) to make for them too!
Becky
I would like to make this recipe and put it on a graham cracker pie crust. Have you ever tried this or do you not recommend this?
Si Foster
hmmmm I have not tried it, but I am sure it will work. Just follow directions for filling and use the crust instead of cookies.
Take a look at the lemon cream pie I posted recently, the Nilla Wafers will look cute placed on top similar to the way we garnished with the lemon slices! Will you let us know if you try it??
thanks so much!
xo
Si
anakonda
Hi Becky, funny you mention: that is exactly what I am doing today (I’ve made this recipe several times: the best out there!). I will use the already crumbled Graham crackers (which I found out it is cheaper than the crackers and already crumbled in a box!). I want to make the pie crust at home, because I can control how crumbly I want it. Will let everyone know how it turned out. I think for the pie crust alone, it would be too creamy: maybe you can use pie crust and still put some crackers in it. I will make the crumbs and sprinkle them in between too, for some structure.
anakonda
I absolutely love all the emphasis and remarks you made throughout the recipe: they are so very important, and yes, people skipping or modifying them need to know what they are doing first: I usually follow the recipe to its “T” for the first time – unless I see some ‘weird,’ disproportional ingredients recommendation. Your [this recipe] seems to be right on point to perfection! So, I am not changing anything about it. I have not made it yet: waiting until Saturday, to be eaten on Sunday! And will leave a review. 🙂 Thank you so much for making this available, and for being true and honest about the details and time to set, etc. My son adores banana pudding, but my last one (from another – very poor, recipe!) was horrible! I thought I would never, ever make it again and was about to order some from Magnolia (directly) – until I saw how much they charge of a small container plus shipping! And then, your I found your recipe! Thanks again for this! Bests
Si Foster
Thank you so much Ana! I think you will love this recipe and would love to hear back after you give it a try! And yes, this option is much less expensive than having it shipped. Give the chocolate a try as well, I absolutely love the chocolate version!
xo
Si
Samantha
Magnolia Bakery makes their own shortbread/cookie that goes into their banana pudding. It’s not bills wafers. I spoke with an employee about it.
Marge clayton
Fabulous dessert! I never thought there would be a substitute for chocolate cake but Magnolia Pudding hits the spot like nothing else. You can’t go wrong with this dessert; always a winner!
Ronda
I have made many different banana pudding recipes and this is by far the very best. The cream cheese and sweetened milk makes all the difference. Yummy!!
Si Foster
I agree, Ronda, thank you so much for sharing and for reading ABK!
xo
Si
Zoë
What is the shelf life after it’s all done?
Si Foster
Hi Zoe, I would say the max shelf life is one day after you’ve eaten it, but two days if you’re letting it sit in the fridge before you eat it. Thank you for reading ABK!
xo
Si
Robyn
Oh my goodness, sooooo good! I accidentally used cook and serve pudding instead of instant and it didn’t work, so don’t make that mistake. I started over with the right ingredients and it turned out amazing. We had leftovers and ate a little each day for several days!
Si Foster
I’m so glad to hear that, Robyn, I love how quick and easy this recipe is. And the leftovers are even better! Thank you for sharing,
xo
Si
JOe Vernuccio
I have made this with great success.
However, notice that the ingredients listed on Goldbelly list eggs!
Where do you suppose Magnolia sneaks these in–hmmmm?
https://www.goldbelly.com/magnolia-bakery/world-famous-banana-pudding-party-sized?ref=merchant
Lindsey
Have made this many times. SO delicious! Fun to make with my kids, too.
Si Foster
Thank you Lindsey! It is a kid friendly dessert for sure and easy to make together.
Thanks for reading ABK,
xo
Si
Marge clayton
What a surprise to turn regular old vanilla pudding into a miracle dessert! This recipe is incredible and was loved by all. When I’m not on a diet, I plan to fix it regularly 😂😂😂. It’s the kind of dessert you can’t leave alone. It makes up so quickly and looks yummy in a clear bowl or individual dishes. Thanks so much! Five star WIN!
Si Foster
I agree Marge, this dessert is one of my favorites because of how easy it is to make and it always is a hit. Thanks so much for sharing!
xo
Si
Katie
This recipe was SO simple and has very few ingredients. The hardest part is planning ahead, but it’s worth the wait! My whole family (including my very picky toddler) loved this recipe.
Follow the instructions – especially the note about the bananas ripeness and the quality of ingredients.
If my picky family loves this dessert, so will you!
Melissa
I made this the other day and it was SO GOOD!!! Still good a few days after I made it! I’m planning on making this as one of my desserts for Christmas! Thanks for a great recipe!!
Si Foster
I agree Melissa, they are always better the next day! Thanks for sharing,
xo
Si
Briana
The best banana pudding recipe EVER! I did use whole milk instead of water that it called for. I also doubled the recipe and it turned out amazing. No one waited the amount of time they were too ready to eat it!! I made it not even 3 hours ago and it’s already gone! Seriously SO GOOD! I can always count on your website for the best recipes ever, love them.
Star
Brianna I need to double recipe as well, were there any other changes you made other then doubling?
TIA
Cara
I made this yummy pudding for my family exactly as directed and it was a huge hit!! I love that the recipe is so simple. My sister told me I am now obligated to bring it to every family dinner. Thanks for the great tips and wonderful recipe!
Si Foster
I love how simple this recipe is too, Cara, it’s perfect for big family dinners. Thanks for sharing and for reading ABK!
xo
Si
Brittany
Hi Si,
I saw someone made a chocolate version of this recipe on your video feed. Do you have recommendations for how to make this into a chocolate banana pudding?
abountifulkitchen
Hi Brittany,
I have a chocolate version in the works. Ill email you the details!
xo
Si
Brittany
Thank you very much!
Kelly
If I have a small family and just want to make this over the weekend, how well do left overs sit in the fridge? Should I just make individual servings for one night, and then prep a second batch later on for the next day?
Si Foster
Hi Kelly, I would make this recipe the day of serving, but it does take a couple hours of prep work, 3-4 hours for pudding to set, and then an additional 4-8 hours for the assembled dessert to set up. Hope this helps and thanks for asking!
xo
Si
Sarah
Hi, thank you for the recipe! Banana pudding is one of my most favorite desserts. My mom used to make amazing banana pudding and I don’t have her recipe. I can’t wait to try this!
abountifulkitchen
Hi Sarah,
I think we all have a sweet memory of banana pudding served to us in our childhood! I think you will love this version >3
xo
Si
Beth
Thank you for this recipe! I took my daughters to NYC and we got a banana pudding nightcap every night from magnolia! I’m excited to make this recipe with them! I have one question…by “three layers,” do you mean a layer of pudding, then cookies and bananas, then a layer of pudding and it’s finished, or do you mean a layer of pudding, then cookies and bananas, then repeat two more times so you have four layers of pudding and three layers of cookies/bananas? I know this should be intuitive, but I want to make sure. Thank you!
abountifulkitchen
Hi Beth,
I believe the original recipe from Magnolia suggests three layers, but I just kind of wing it and create my own layers. I like to start with pudding and then lay the bananas right on top of the pudding because I want the bananas to be completely covered, I think this helps with prevention of browning of the bananas. If they are completely covered with pudding they seem to brown less! So any way you like to layer is fine, I like the look of pudding on top and a few crumbled cookies and/or a slice of cookie and banana on top! Other than the tips I suggest, this is a very forgiving and kind of a throw-together type of dessert when assembling! 🙂
thanks for reading ABK,
xo
Si
Lori
Yep, a friend introduced me to this recipe a couple years ago and it really is THE BEST. I usually divide it into two containers and deliver one to a friend when I’m making it for just my family, it’s too good not to share 🙂
abountifulkitchen
Lori,
Great suggestion! I think I’ll pick up a few extra clear containers from the deli and do the same next time. Last time I made this dessert I ate WAY too many servings of the leftovers!
Thanks for reading AbK,
xo
Si
Kelly K
I give this 2 stars for convenience, but no true southern banana pudding recipe would ever use condensed milk and pudding mix. Yes, I’ve had this recipe, and it is tasty. But the amount of sugar in the pudding and the sweetened condensed milk was tooo much. Why use these products when a homemade vanilla pudding is so easy and oh so much better?? Guess my southern family spoiled me for banana pudding, and boy am I glad!
AlexanDra
Lol..I don’t know why the closing sentence made me laugh but it did..but anyways..no one here or the restaurant claims this to be a southern style banana pudding soo..calm down😂
But I find it a little odd that you’re online, looking around for some new recipes of banana pudding, when you’re “so glad” with what you’ve got 😕🤨.. N why did u take the effort to make this when u knew ahead of time, it called for sweet. Cond…milk?? N then speak negatively about the recipe, saying it’s so sweet n that sc.milk, wouldn’t b found in a southern style recipe…Well then don’t make go around making these another versions 🙃🤪😐 and “boy, you’ll
Be so glad” 😉..that u didn’t.
N I’m sorry..you’re probabky a nice person n I’m being ugly but your comments made me laugh.
Denise
I’m as Southern as they come from HTown… & I tell you this is the best banana pudding I’ve EVER had!! I’m very picky. And I do like the cooked puddings. But for the convenience & my taste buds (& I’m on chemo so everything makes me kinda sicky!!! This recipe is delish!! I give it 5 stars. Thanh’s so much for sharing. Your Southern friend. Lolll
XOX 💜🦋💜
LB
This is my favorite comment. Thank you for calling them out lol. Off to go make this recipe!!