
10 Tips for designing a kitchen will help you create the kitchen of your dreams and avoid common mistakes while remodeling or building! I’ll answer questions I’ve been asked countless times about designing a kitchen, no matter the budget. Everything from appliances, to outlets and even how to decide if marble countertops are right for you are covered in this post!
Heart of the home


The kitchen is the heart of every home. Everything happens in the kitchen: talking, listening, celebrating, laughing, crying, memory making and of course, cooking! The kitchen is also the most expensive and challenging room to build or remodel. A kitchen that works for your family requires more than simply selecting beautiful finishes, it needs to be functional and inviting too. With so many factors contributing to designing a kitchen, I’ve compiled basic guidelines to help you tackle key elements of designing a kitchen your family will love.
Been there, done that

When you’re ready to take the plunge into remodeling or even building a kitchen from the ground up, it’s difficult to know where to start. We have successfully (ha, I can say that now!) survived several home remodeling projects that vary from do-it-yourself to hiring a professional. Our budget has ranged from a few hundred dollars to thousands of dollars. 10 Tips for designing a kitchen will give you a starting point for many of your questions about a kitchen remodel! I’ve tried to answer questions I have received time and time again through the years…questions that have come by email, comments on a post, texts or phone calls regarding how to design a kitchen. ABK is read by people all over the country, so I don’t mention any local builders or subs in this post (except for my designer). My advice on picking a reliable source for everything from a builder to a cabinetmaker, is to simply talk with friends who have recently remodeled or built. They will give you valuable recommendations! I’ve sorted this post with titles that will (hopefully) make it easy for you to locate information!
Function first
Some of the advice on this post is given from a design standpoint, but most is from a practical viewpoint. I’m all about function first in a kitchen setting. I cook a lot, so my kitchen was designed with cooking, living and entertaining in mind. Almost everything in our kitchen has a function and purpose.

Counter surfaces and why marble may, or may not be right for you…
From an overall design standpoint, the countertops and cabinets are (day in and day out), two of the most expensive and visible decisions made when planning the kitchen design. I suggest collecting several samples of countertops and cabinets to take home and view in the kitchen space if possible. Simply looking at a sample in a showroom (or out in a parking lot) won’t give a true reading on how the surface will look in your kitchen. Countertops and cabinets are (most likely) the elements of your kitchen that will stay standing for the longest period of time, until the next remodel.

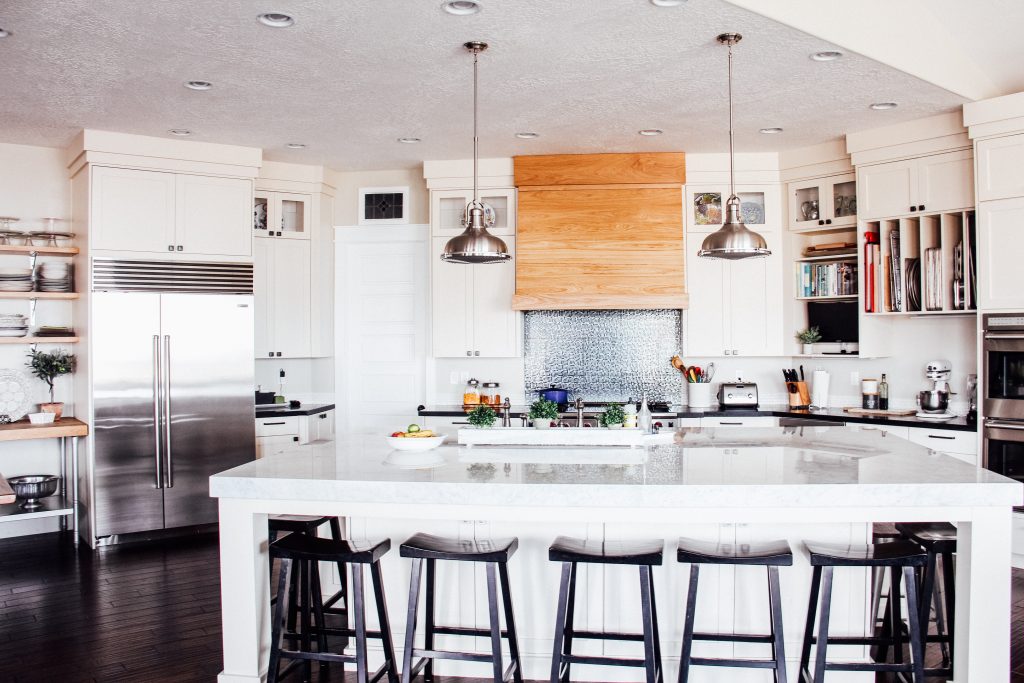
There are countless options for kitchen countertops. Everything from concrete to wood to formica (made to look like stone) are available. I chose Carrera (sometimes spelled Carrara) Marble for the main island , which measures 128″ x 80″, and a honed granite for the perimeter countertops. I love my countertops, especially the marble. But it’s definitely not for everyone! A caution about marble countertops… I love the look of marble *BUT* I no longer have kids at home who do art projects or pound blocks on my countertops. I’m also not very particular about my countertops looking perfect. If you are particular, don’t invest in marble. It chips, pits and water marks are easily seen. If you cook a lot, like me, and anything acidic lands on the counter, it needs to be wiped up immediately to avoid pitting the marble! I was told before I chose marble that it stains easily, and stains were almost impossible to remove. I haven’t had a lot of issues with staining, but I have a lot of water marks and pitting on the marble.

I once left some frozen blueberries in a bag on the counter, which I didn’t see until a couple of hours later; the stain came off easily with a little soap and scrubbing. There are dull areas on my marble island and it doesn’t bother me. I love the worn look of marble and wood, so I’m fine with a bit of a dull look instead of a shiny finish. If this concerns you in any way, I suggest choosing another surface, such as quartz. There are many white quartz surfaces which typically cost a bit more than marble, but are more kid friendly and forgiving when it comes to stains, wear and tear. If you decide to go ahead with marble, my recommendation is to go to the source of the marble and pick out your slabs. Take a good look at the marble, and ask questions about quality. If possible, take someone with you who can spot the difference of quality in marble or stone. Although you may be told the quality is the same, some countertops chip easier and also have cracks that may develop into deeper cracks after installed. I learned this through trial and error. Marble may also be sealed to reduce water marks and other staining.

The honed granite countertops (above) on my perimeter are black and unpolished. They have a matte, instead of a shiny finish. Both the polished and matte finish have their advantages, and disadvantages. If the countertop material is dark, crumbs and fingerprints and dust show no matter the finish. The shiny or matte finish is a matter of preference. I’m not going to say much about cabinets because I’m into simple design and straight lines, without much fuss when it comes to cabinetry. I like flat front drawers and simple shaker-style cabinet doors. Cabinets costs can make or break your budget. I tried to find someone who was in the middle as far as cost goes for cabinets, not the least, nor the most expensive option. Search high and low for a cabinet maker with good quality products and a person who stands behind their work. Again, ask friends for recommendations!

Countertop height and barstool considerations
There aren’t any barstools in some of the kitchen photographs because the bar stools are in the process of being replaced (or possibly repainted). I haven’t decided which yet! I had the kitchen counters elevated from a standard height, because I’m fairly tall (5’8) and wanted the countertops a little higher than the standard of 36 inches. My countertops are 38 inches tall, with 27 inch barstools. The bottom of my countertop is 32inches because of an overhang (under the marble counter) which you can see in the photo above. If you have counter tops installed at a non standard height, you may want to choose barstools beforehand, to make sure they fit! Stools may also be custom made if your countertop height is not standard.

Tile and backsplash
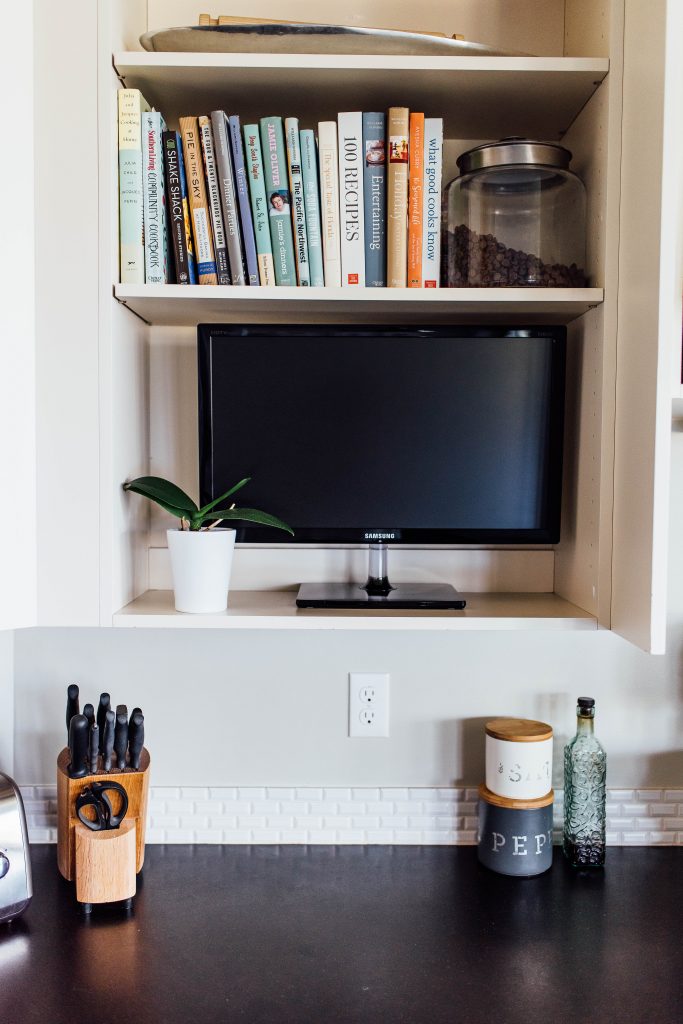
I love subway tile, but didn’t want large white subway tile in the kitchen. Our designer, Calli, suggested subway style tile on a small scale that is not glazed. I absolutely love it. It’s small and understated and is only in a small portion of the kitchen, just above the black granite counter tops. The other tile is a 13×13 square, set behind the range. I wanted the look of glass tile, without the cost. Again, Calli suggested this tile which is a simple ceramic tile in a shiny finish. We asked our tile guy to set the tiles as close together as possible, with the minimum amount of grout showing. The grout color matches the color of the tile so it blends in as much as possible, creating the look of a wall of tiny tiles. The difference in cost of individual glass tiles vs ceramic tile squares was about 75% less. Yay! Finally something that came in under budget! The glazed ceramic tile is low maintenance. In 5 years all I’ve done to maintain the tile is wash with bit of soap and water and wipe off.


Wood features


The hood above the range and the open shelving are made of maple. The wood features in the kitchen are anchored on five pieces. Three of the four pieces are made from the same maplewood: the hood over the range, the open shelving over the refurbished prep table (left side of photo), and the wood on the shelves above the built in desk (right side of photo). The Square free-standing island is 57″x57″ (dark wood) in the center of photo and is 36″ tall. It was also custom made to hold large trays and other serving pieces and serves mostly as a buffet table.
The refurbished worktable above was originally in Woolworth’s in Salt Lake City. I purchased it from a friend, and had the countertop cleaned up. We left the ink stains and water rings on the table (for nostalgia sake) left the wood unfinished, and had the bottom of the table sandblasted to cover the rust. I used the same paint color on the legs of this refurbished table as we used on the brackets for the shelves above. The brackets were purchased at an industrial supply store, we looked for something sturdy and plain (I believe they were white when purchased).
Flooring
We used an engineered (pre finished) wood flooring in a dark color on the entire main floor. The choice to install a pre-engineered floor was made primarily because we have a black lab who regularly comes into the house. In our last home, we had a sand and finish wood floor in a lighter color. Preventing the floor from getting marked up was really difficult when the dog gets excited and starts running around inside! We were left with marks in the wood, which could have been removed from refinishing, but I was hesitant to refinish the floor only to have it damaged again by the dog. We have had much better luck with the factory finished floor, the finish is baked on after being applied, so the surface is more resistant to scratches, indentations, etc. That said, this is one of the few things I would have done differently in the kitchen if I had it to do over again! The dark color is difficult to maintain. Every speck of flour or dust shows on a dark floor. As I said, in our last home I had a much lighter wood floor which I highly recommend. When it’s time to replace or refinish this floor, I will most definitely choose a light color.


Bake center
I love the bake center, it is one of the most efficient work areas in the kitchen. I bake several times a week and keep my most frequently used baking supplies in this part of the kitchen. The baking area consists of a space above the counter top with open shelving (large enough to store most of my frequently used pans) including baking sheets of all sizes, muffin tins, pizza pans, cooling racks and also space for cutting boards. I have a second cabinet with dividers, behind the doors above the double ovens which stores serving platters and covers for jelly roll pans.

The highlight of the baking area are the lined drawers for flour and sugars. In our last home, we had three large drawers: one each for flour, sugar and rice. Yes, rice. My mother is Japanese, so we eat a lot of rice. At least we did back when we were raising kids! When we built this home, I decided it was better to designate two large drawers, one each for flour and sugar, and one divided drawer for powdered sugar and brown sugar. I love this new combination. I still keep a large tub of rice in the pantry, next to my rice cooker. Most cabinet builders have access to drawer liners for storing flour, sugar and other dried foods.


I love open shelving for the bake area. It allows me to see exactly where all of my sheet pans and other frequently used baking pans are stored and makes it easy access happen quickly. Deep drawers are used in the baking area, not only for storing dry goods, but also for items I use frequently while baking such as: soda, powder, salt, cookie scoops, scales, and cooking spray to name a few. Drawers are best for easy access, instead of cabinets with deep, dark corners.
If you have the room and budget, install a small under counter fridge to house all of the items used for baking near the bake center. I usually keep this mini fridge stocked with eggs, milk, butter and a soda, or two 😉 Under counter lighting is nice (see in photo above) , but honestly, I hardly ever use it. Some people love the under counter lighting because it doesn’t cause any direct shadows and it makes for a convenient night-light in the kitchen! Definitely a non-essential item for me. If I every built another kitchen, I’d pass on under counter lighting.
Sinks and faucets
I’m really particular about sinks! This may seem odd, but my criteria for a sink was my baking sheets (jelly roll pans) could fit in the sink and completely soak without any of the pan sticking out of the sink. This sink is a Fireclay 34″x21″ apron-front divided model, and is made by Franke. I opted for Delta faucets, two sets of the same design in a brushed finish. Im often asked about cleaning the sink, I wash it out with a bit of soap and then spray with Clorox Cleanup Cleaner+Bleach to get it sparkly white!


I love the look of a big countertop with only one sink, so I chose one sink with two faucets instead of a separate small sink. In our last home, I had a small sink installed in the island. I chose a cute little faucet without a sprayer or disposal. It was difficult to clean and a “vegetable sink” without a disposal was a bad idea. I’ve loved the large sink with two sets of faucets.
Appliances- good, better, best
In my last kitchen (which we remodeled top to bottom) we purchased the following: Viking gas cooktop (36 inch, 4 burner with griddle ) and Viking under counter refrigerator (essentially a wine cooler we converted to a fridge for milk and eggs), GE Profile convection ovens, Subzero Fridge with freezer drawer and Maytag dishwasher. The Viking gas range had starter issues from the time it was installed that were never fixed. We had similar repair issues with the Viking under counter fridge. I loved our Subzero fridge, Maytag dishwasher and GE ovens. Other than normal maintenance, I didn’t have a single problem with any of the brands (other than Viking) for over 10 years. I’ve listed the brands and my thoughts below on items we have installed in the new kitchen. All have been in use for 5 years at the time of this post. All items purchased were Wolf/Sub Zero/Asco.
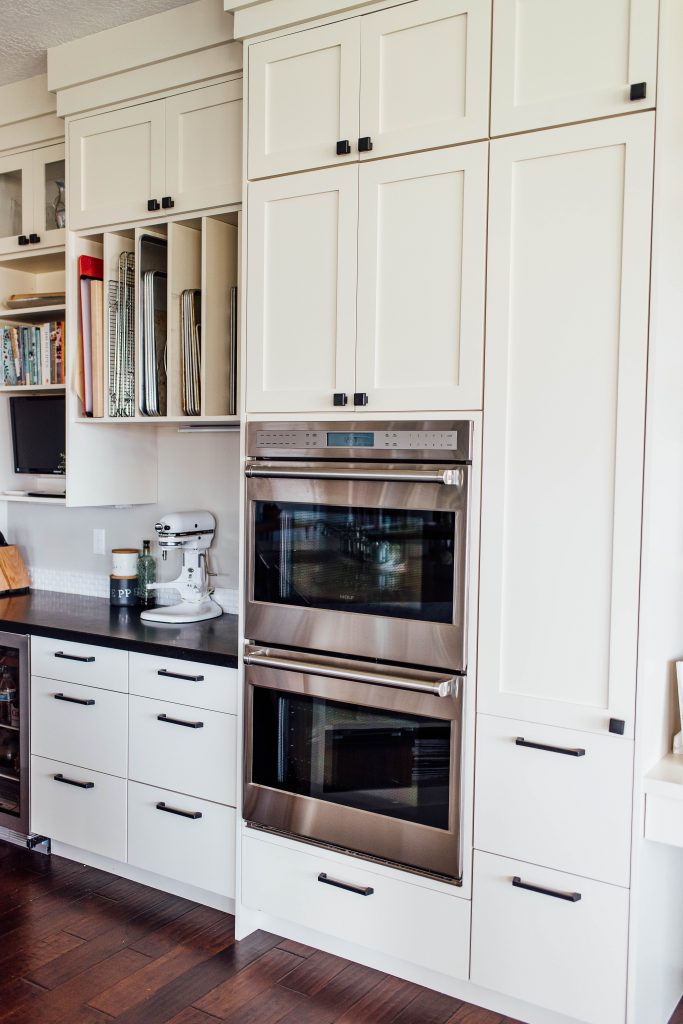
- Double Wolf electric ovens. I highly recommend electric heat for baking. The top oven is convection, the bottom standard. The oven is easy to wipe out if anything spills. The ovens are “E Series” with every thing from dehydration to proof, to a special setting for baking pies. Excellent quality.
- Refrigerators: Both are Sub Zero. Both work exceptionally well. Not a single issue in 5 years. I use the top rack in the under counter model to cool cookies and other baked goods quickly and keep the small refrigerator set at 34 degrees. I’ve never once had an issue with items in the back of the fridge freezing (which happened constantly with my Viking). The full size fridge/freezer combo is a 48″ sub Zero side by side model with ice maker in the freezer.
- Dishwasher: We purchased an Asko dishwasher. This was our only lemon purchase in the kitchen. From the beginning we had issues with the dishes not being completely clean, water standing in the bottom of the dishwasher, door of the dishwasher rolling out, etc. We had it serviced a few times, and finally after five years, I replaced it with a Bosch. I LOVED the space on the top shelf of the Asko dishwasher. It held tall glasses and drinking mugs, and in my opinion, is the best feature of the Asko dishwasher. l’ll update this post in a few months, but for now, the Bosch is up and running and the most quiet dishwasher I have ever owned. Update January 2020. After having the Bosch in place for 2 years, I am 100% a fan. No issues with dishes not being clean after a cycle, quiet, efficient, excellent piece of kitchen equipment.
- Gas range and double gas oven: The Wolf 48″ gas range with double griddle and ovens is a beautiful and functional anchor piece in a large kitchen. I love this appliance. The 4 burner model with double griddle is perfect for us. We use this feature several times a week for everything from pancakes to grilling tortillas. I never considered getting more than 4 burners because I knew times are few and far between when I actually need more than 4 burners. A pan can always be placed on the griddle with the heat turned on to replicate another burner if the need arises. We opted out of the dual-fuel (gas on top, electric on bottom) range because of cost. There was a significant cost difference from a gas range and gas ovens, and I already had double electric ovens in the kitchen. I use the gas ovens less than any other appliance in the kitchen. I’m not a fan of the gas ovens, so unless it’s Thanksgiving or Christmas, or I’m baking a lot of dishes at once, the gas ovens go unused. I had a warming drawer in my last kitchen and used it occasionally. I dont’ recommend a warming drawer unless you have an unlimited budget and ample space. I believe your money is better spent simply purchasing an additional oven!
- Microwave: My microwave is in the pantry, on my countertop, which works for us!

Here are a few elements I love in the kitchen, which aren’t mentioned above…


10 Tips for designing a kitchen
- GATHER IMAGES/ PIN LIKE THERE’S NO TOMORROW Start Pinning images NOW. Tear out photos from magazines as well. Our kitchen design was inspired from a page in a Pottery Barn Catalog (above)! I printed out images from Pinterest boards and magazines and placed the images in plastic sleeves. Once I had a stack of most loved images, I organized them into a binder and categorized the photos by cabinets, countertops, lighting, hardware, etc. A hard copy made it simple to show my contractor and designer what I loved. I took photos of home interiors as well. Design tip: If you are constantly Pinning white kitchens, you are attracted to white kitchens, don’t let someone talk you into a blue kitchen.
 Several yeas ago there was trend to paint one wall an accent color. Red was the IT color. UGH. We love the Utes, but a red wall?? I hired a decorator to choose colors for my family room. She insisted that we paint one of the walls red. I knew there was no way we (especially Grant) would be able to relax in that room. I knew we needed a room with a more neutral color, so instead of being pressured into the red room, I went another direction, found another designer and was happy with the result (more on designers later). There is a reason why we Pin certain items, or ear mark the same looks over and over again in magazines. It’s because we are most comfortable living in that world. Be true to yourself. Don’t go with a trend because everyone else loves it. Pick what you love. You have to live with your choice!
 - BUDGET BUDGET BUDGET– This should probably be #1 on the list! Make a budget and allow for (at least) 20% over your budget. 30% is even better! In other words, if you absolutely cannot spend more than 3,ooo on a kitchen remodel, your budget should be $2,400. We have never completed a remodel project where we didn’t go over budget. It starts with a new counter top, and then the tile needs to be replaced, paint, etc…20% is the minimum amount to allow for overage.
- HIRE A DESIGNER, EVEN IF YOU ARE THE GENERAL CONTRACTOR It’s tempting to think you can do this yourself. Trust me, you’ll save money and a lot of headaches in the long run if you hire a designer. I didn’t hire a designer in our last home when we remodeled our kitchen. The biggest problem with not hiring a designer (in our last home) was paint. It may seem easy to pick the right paint color, but trust me there are about 1000+ shades of any color, even white. I cannot tell you the amount of times I regretted picking the kitchen paint color in our last home. Sure, you can always repaint, but better to get it right the first time! I hired Calli Wade who is absolutely amazing and the easiest person to get along with in the world. Again, I can’t stress this enough, hire a professional. It is worth every penny. When hiring a designer, make sure you are compatible. Meet before you start tearing out walls. Talk budget, their expectations, and yours. Some contractors will discourage working with a designer, again I strongly recommend hiring a designer, even if it is for an initial consultation. In the end you will save yourself a lot of time, money and headache.
- ASK QUESTIONS, TOUR OTHER KITCHENS, PLAY HOUSE Ask everyone who has recently built or remodeled a kitchen what they love about their kitchen. Ask what they wish they would have done differently. Take notes. Make a list. This list will be very helpful to you! Draw out the kitchen design and take an imaginary trip to the grocery. Unload the groceries into your new kitchen. Where will you set the bag of groceries? Where will you store the groceries? How easy is it to navigate around the kitchen? Do the same when thinking about putting away dishes, glassware and silverware. Where will those items go when you unload? How about when you clear the table after a meal? In our last kitchen, I did’t account for clean up. I had no place to put the dishes after clearing the table. My microwave took up that space on the kitchen counter. Go through these every day tasks to save regrets later!
- LIGHT ME UP Install as many outlets as possible. The same goes for lighting. Have a few different lighting panels installed so you can turn banks of lights on without turning all on at once, to control the amount of light in the kitchen. I have lights over the island on one switch, lights over the cooking area on another, the third switch controls the lights over the perimeter of the island and kitchen, and a fourth switch for the under counter lights. As far as outlets go, I had an outlet installed in the island underneath the counter top for easy access to plug in small appliances such as a can opener, food processor, etc. The outlets also come in handy for charging phones, computers, iPads while sitting at the counter. This is one case where less is not more. Plan for more lights than you think you’ll need.
- SMART STORAGE Pinterest is overflowing with ideas to make the most of storage space in the kitchen. The space underneath the island is often overlooked. We used this space to install two sets of cabinets which hold vases, candles, folded tablecloths and seasonal items used in the kitchen.
 Cabinets were also installed above the everyday
 - cabinets. We use the cabinets up high to store items such as glass pitchers, extra plates, appliances that are not used often and seasonal servings pieces. On both sides of our range, we had spice racks installed. Think outside the box when creating space for storage, and always build in as much storage space as possible!
- HOLD ON TO YOUR DRAWERS I highly recommend using drawers instead of traditional cabinets for everything under the counter. Drawers use space efficiently and organization is a much easier task in a drawer. We had deep drawers installed in our baking area and also alongside the dishwasher. If you do choose traditional shelving, install roll-out shelves for easiest access to everything stored in the cabinet.
- PANTRY – MVP OF THE KITCHEN -You know the advice to buy as much house as possible? I can not emphasize this enough. If you have a choice, build as much pantry as possible. If you have the budget and space, install a countertop in your pantry. We use our pantry countertop to store everything from a printer to our microwave. Have a lot of space? Add a fridge and/or freezer to your pantry. When installing shelving in the pantry , there are countless options available, I like a solid shelf, no more than 12 inches deep. If your shelves are deep, items will get lost in the back of the shelf and go unused. I like to plan for at least 24 inches from the floor to the first shelf in the pantry. This allows for large buckets, a case of paper towels, 10# cans, etc., to be easily stacked. Make sure you have proper lighting and outlets in the pantry as well!
 If you have the space, always install a pantry door. I chose a solid door to hide unsightly messes in the pantry, as opposed to a door with a glass front. When I have large gatherings, I put a small table up inside the pantry, to use as a mini staging area. With the exception of my spices and baking area, all of our non-perishable items are stored in the pantry. One last thing, I installed nails on a blank wall in the pantry to hang odds and ends pans such as: aebleskiver pans, crepe pans, strainers, etc. Okay. One more last thing. There are no photos of the inside of my pantry because it’s a MESS. One day, I will organize it and post photos. And I’ll link the post here 🙂
 - DON’T CROWD ME Make sure you have at least 36-48 inches (if at all possible) in any walkway in the kitchen. I allowed for 60 inches between my range and kitchen sink. There should be at a minimum 12-24 inches between a fully opened dishwasher door and the cabinet or countertop across from the dishwasher. Same with the oven door or refrigerator door. There should be space for a person to comfortably walk between an opened appliance door and the wall or cabinet behind the opened door. I know some kitchen spaces, especially remodels, don’t have this luxury but again, if at all possible allow this space.
- DON’T FORGET THE GARBAGE Last, but not least, don’t forget about the garbage! Im not a fan of trash compactors. In our last two kitchens, we designated space for a double garbage roll-out. One for garbage, one for recycle. I think the best place for the garbage is right next to the sink. If you don’t have or want to give up space for a built in garbage, make sure to allocate space in the kitchen for a garbage can. It should be close to the sink or dishwasher and be out of the way of heavy traffic!
I hope this post is helpful when you’re contemplating remodeling or building a kitchen. I understand budgets and circumstances vary. We have lived in apartments with kitchens so small there wasn’t room for more than one, and have done so many DIY remodel jobs I wish I had taken photos to share! This post is meant to cover all we’ve learned as we have remodeled, and now built a kitchen from start to finish. I’d love to hear your questions, comments, and your personal experiences while building or remodeling. Share your tips in the comment section below! As always, thank you for following ABK. This blog is nothing without your support <3
xo
Si

Designer – Calli Wade
Photos on this post- Bre Welch Pepperfox Photo
Colin Singleton
Such a helpful and beautifully written post! I love how you balanced practical advice with personal insight—it really feels like guidance from a trusted friend. Tips like planning for plenty of storage and thinking through your cooking habits ahead of time are so smart and often overlooked. Your kitchen is absolutely stunning, and it’s clear every detail was chosen with care. Definitely bookmarking this as I plan my own kitchen refresh—thank you for sharing your wisdom!
Visit Our Website : https://bluewaterservicesnc.com
Jillian
Hi Colin!
Thank you so much for the great comment. We really appreciate your kind words!
Best,
Jillian
ABK Team
Laura
I am in Utah and am having a hard time finding tin inserts for flour/sugar drawers. The cabinet company I am using has never heard of them before. Can you tell me where you got your cabinets?
Jillian
Hi Laura!
Si recommends picking a reliable source for everything from a builder to a cabinetmaker, is to simply talk with friends who have recently remodeled or built. They will give you valuable recommendations! She’s sorted this post with titles that will (hopefully) make it easy for you to locate information!
I will also reach out to Si and see who she had make her cabinets and get back to you.
Have a very Merry Christmas!
Jillian
ABK Team
Si Foster
Hi Laura,
The cabinets came from North Davis Cabinets in Layton, Utah.
Hope this helps!
XO
Si
Cody
Wow what a good looking kitchen. There is so many great ideas here! Love the open cabinet style and the openess overall of the kitchen area. This is a beautiful job!
Monica Bird
Very impressive, thanks a lot for sharing a helpful post with us.
Isabella Olivia
Really nice
jasmine Madison
Honestly what a beautiful designing kitchen gala i might need. Thanks for you sharing
Si Foster
Hi Jasmine!
Thank you and thank you for reading ABK.
xo,
Si
Contractorfinder
This post is a great read for us, because our kitchen is about to be re-done and designed, so it’s not a huge undertaking. My home needs a complete overhaul, and these are just what I’m looking for! I truly appreciate all the wonderful ideas that you have shared.
Purlin AI
Wonderful ideas.. Amazing concept and decor tips. This is truly a great read for me!! Once again, thanks for the quality articles you post on your blog!! That is very interesting & awesome post. I am always searching for informative stuff like this! I will check here often for more cool stuff
You also Visit modern homes california
Angie
I have cherished this post as we have been designing our kitchen-thank you! Are your flour and sugar drawers lined with plastic removable inserts you can take out and clean? We live in Idaho and none of the cabinet people up here seem to know about inserts for flour drawers. I don’t know if it’s because we are behind in everything or what ha.
Si Foster
Hi Angie,
Of all the features in my kitchen including the last kitchen we had remodeled and designed, the flour and sugar bins are my favorite and probably the most useful! They are just tin bins, and are not lined with plastic inserts. About once a year? I wipe them out when they are close to being empty. Because they only hold dry goods, they don’t tend to get dirty. they have a top that slides closed over each drawer. I am really surprised you don’t have these available in Idaho! Maybe try a Utah builder/cabinet shop I think the liners are fairly common now!
rachel frampton
I’m planning to elevate my kitchen area by having wood wall panels installed at the bank of its sink area. Well, I agree with you about the importance of choosing stylish countertops and cabinets because these two are the elements of my kitchen. Thank you for this; I’ll make sure to seek recommendations regarding the cabinets.
G.M.S. Werks
It is a beautiful article stating about the 10 tips for designing the kitchen. I am really happy to come across this exceptionally well written content. Thanks for sharing and look for more in future! Great points!! I love this blog; please keep us updated with such information.
Dyck N.
I really appreciate an article like this, especially now. We specialize in bathrooms but recently jumped in to doing kitchens as well so this is such good timing to find these tips. I took some notes and will be implementing your ideas when we renovate.
Si Foster
I’m so glad to hear that, Dyck, let me know how the renovation goes! And thank you for sharing,
Si
Universal Stone
Awesome idea! These ideas, especially marble countertops will definitely help one in designing their dream kitchen. Keep posting this kind of stuff!
Sabrina Addams
I loved the picture of the backsplash in your kitchen behind the burners and how the blue, small tiles almost look like glitter and match nicely with the wooden hood. My parents are thinking of custom building a home for their retirement next spring. They love colors and unique designs, so I think I will recommend that they hire a custom home designer to get them the fun looks they love similar to this.
Homer Parker
Excellent tips!. Your stuff is really super awesome and very helpful too. You have mentioned only five benefits but I think you can also add up the more images, more features, or celebrity too. Of course, When I have to go to the kitchen designs I feel dizzy. Finally, I got my plan cooking, appliances are the most important! reading your post and it rejuvenates me desperately. Thank you so much for sharing your wonderful information !!
Ellie Davis
I liked that you mentioned you need to consider selecting beautiful finishes for your kitchen remodeling, but also make it functional. My husband and I are thinking about remodeling our kitchen, and we are looking for advice. I will let him know about your recommendations to help him design our kitchen.
Si Foster
Thank you, Ellie! I hope you find the post helpful for remodeling your kitchen, it’s always about functionality for me (and beauty!) since the kitchen is the most used space.
xo
Si
Sophia Slate
I like how you stated that the kitchen is the heart of every home. My husband and I are currently in the process of having our home custom-built, and need to design the kitchen. I will definitely keep all of your great tips and information in mind when trying to design the perfect kitchen.
Si Foster
The kitchen is where the heart is, haha! Thanks for sharing, Sophia, and keep me updated on how your kitchen design turns out.
xo
Si
Kitchenfolks
Hei Si, I feel happy to see your amazing kitchen. It’s really neat and clean. Can you tell me do you use wood tiles in your kitchen? And thank you so much for giving these useful tips about kitchen design.
Faylinn Byrne
I never knew that you could take notes and tour other kitchens to get inspiration about what yours should look like! This is a really neat piece of information, and if I were to guess, not a very used one. You did a great job of explaining all the possibilities of designing a new kitchen, and how you can also take advantage of hiring a designer for it.
Nosulire
We’re currently looking at re-doing and designing our kitchen, so this post is fab, as it isn’t all that big. I’m looking to completely change the styling and these are right up my street! Thank you so much for sharing so many amazing ideas.
Benjamin Andrews
I found it interesting that you state that countertop height is important when designing your kitchen. My wife and I are looking into getting a new kitchen done and we want it to look great. I will keep this in mind and look for a kitchen remodeling service to help us.
abountifulkitchen
Benjamin, I think the countertop height is very important! Make sure it is at a comfortable height for both of you and especially for the person who spends the most time in the kitchen! Thanks for reading ABK,
Si
Andrea G
I am assuming your cabinets were installed that color and not painted?? Do you remember the type/color of cabinet? Or If they were painted do you know the color?
We have black counter tops and I would love to pain our cabinets this color with the black pulls rather than the odd reddish brown that they are now…thanks!!
Si Foster
Hi Andrea, they were installed as painted cabinets and I’m sorry I don’t have the color recorded! But I love the contrast between the countertops and the cabinets. Thanks for asking,
xo
Si
Jennifer
We are coming to the end of our kitchen remodel and it’s very exciting. I really wanted a designer but my contractor was totally against it, lol! It is a good thing that I had a lot of pictures to help me. I knew what I wanted. The only thing I wish I had stuck to my guns about was 2 ovens! I ended up getting the GE Profile advantium convection/microwave combo with electric oven underneath. It’s supposed to bake just like an oven but I’m not totally sure about it. My husband was all over it. I would change that appliance for 2 wall ovens and put a regular microwave above my coffee bar area. But it’s done now so I am keeping my fingers crossed it works out for us! I agree with you on the color of the hardwood floors. We have similar and I love them but I sure wish they were a little lighter! We have had them for 7 years now. I also love all the drawers instead of regular cabinet shelves. That was a number one deal for me! I also have the Franke apron front sink but not divided. I put in honed granite because I still have 2 kids at home and needed durability!!! But I told my husband that in the future my next kitchen will be marble! I loved this post! Thank you for sharing. 🙂
abountifulkitchen
Thanks Jennifer. So fun to hear about your choices in the kitchen! Sometimes we make choices that we just learn to live with, right? I appreciate your thoughts!
Thanks for reading ABK,
xo
Si
Carolyn Christensen
If you have the space, I highly recommend two dishwashers! The cost difference between a dishwasher and a nice cabinet with pullouts isn’t too far off. Ten years later, I find myself thinking about how grateful I am for two dishwashers on a daily basis!
Si Foster
Great tip, Carolyn! If you have a big family and a lot of dirty dishes, two dishwashers is the way to go. Thanks for sharing,
xo
Si
Dustin Miller
Homeowners also need to remember that too much space is not a good thing! Make sure your kitchen remodel keeps appliances close at hand and convenient.
Si Foster
I agree, Dustin, thanks for sharing your advice!
xo
Si
Eileen Green
Your kitchen and bath are just one of the most important areas of your house. And yes, they deserve to be remodeled too if you think that they are not good enough for you. Mistakes can be part of some remodeling process but as much as you can avoid it, that would be better.
Si Foster
Thanks for sharing, Eileen. I agree, the kitchen and bath are definitely some of the most important areas of the house.
xo
Si
Yoshiko Flora
Since you mentioned that marble chips and gets water marks when used as a countertop, my tip for those having the same issues is to find a granite and marble restoration service. With their help, a kitchen’s interior design can improve. Also, their restoring efforts can add more years to it and the home as well.
Si Foster
Thank you for sharing this, Yoshiko!
Si
Raymond Cooper
I am looking into renovating my kitchen soon, so I’m gathering some design ideas. I really liked your idea to use subway tiles as a backsplash for your stove. I’d love to have something like this for my home.
Diana Rogers
Hi, It’s awesome that this article talked about these cool kitchen designs! I love your kitchen so much. I can’t wait to see my kitchen like yours. I already bookmark your site for future reference. Thanks for the sharing such a beautiful update of your kitchen.
Si Foster
Thank you, Diana, I’m so glad you found this helpful. Good luck with your kitchen remodeling! And thanks for reading ABK,
xo
Si
Ellie Davis
Thank you for pointing out that the kitchen is the heart of the home. My family loves gathering in my kitchen and I want to make sure it is a beautiful place in my new house. I’ll have to look into finding the right kitchen designer in my area.
abountifulkitchen
Thanks Ellie! There is no room in our home that is used more than the kitchen. Good luck with your new build!
xo
Si
Joy Butler
It’s awesome that this article talked about these cool kitchen designs! I love not only the images but how you presented each idea. My sister and I are deciding to renovate our kitchens and we want something new and unique. If you were to ask me, I guess I would go after a smart storage!
Bethany Birchridge
I like how you mentioned that your kitchen’s design should match the functions you want it to have. As I have a dining room, my kitchen is only for cooking. Because of this, so you think I should focus on appliances only?
Si Foster
Bethany, if your kitchen is used only for cooking, I would focus on appliances first. Then, if you still want a little more functionality, you can look at other elements in your kitchen to remodel, like sinks/faucets, countertops, shelves, etc. But for cooking, appliances are the most important! I hope this helps and thanks for reading ABK.
xo,
Si
Robert
Tying the whole kitchen together will be your countertop and backsplash selections. You have many options of materials, colors, and textures to choose from that this decision can become quite daunting. Your kitchen designer will be able to sort through all of the options, and help you to pull every design item in your kitchen into a coherent unit.
Si Foster
Robert,
Thanks for your comments!
Si
Andy Shepard
Really best information regarding countertops. This information really helpful to remodeling the kitchen and bathroom countertops.
Kari
I have the same wolf range with double griddle and LOVE it! We have 5 kids and use the double griddle almost every single day. I would highly recommend it. I got the duel fuel version because I opted not to have wall ovens. The electric ovens are a 9/10. They don’t bake %100 evenly, but close.
Love your Instagram❤️❤️❤️
Si Foster
Kari,
Love that Wolf range! I bet you get a lot of use out of it with your large family. Thanks for your input and thank you for following!
xo,
Si
ellen patton
thanks for all these ideas! i can’t change the footprint of my kitchen and my building is all electric but i got some good ideas from you. i’ll be sure to post about my kitchen update when it happens. right now the only thing i’ve done is had the linoleum floor ripped up.
Si Foster
Thanks Ellen, I can’t wait to see your kitchen! I’d love to hear how things turn out.
xo
Si
Peggy
Love this post. Thank you Si.
After more than a year of planning, we just finished our kitchen remodel. I love Carrara marble and read HUNDREDS of articles about it. My husband cooks often and had concerns about marble and I had some also. Ultimately we chose Neolith Carrara. It is very pretty and was by far the closest look to marble I could find and is practically bullet proof..but there is nothing like the look of real marble.
We are now starting our master bathroom remodel and back to the marble question. 🧐. We will probably use it on the counters.
We installed Miele appliances . There is a little learning curve but they are excellent. We love our Sub Zero refrigerator. We did gulp at the price but it is sensational.
Thanks for all your great advice Si!
Si Foster
Peggy,
I’d love to come see the finished kitchen! Now to the bathroom remodel… ahh, home ownership! Thanks for your input on countertops and appliances.
xo,
Si
Peggy
Love this post. Thank you Si.
After more than a year of planning, we just finished our kitchen remodel. I love Carrara marble and read HUNDREDS of articles about it. My husband cooks often and had concerns about marble and I had some also. Ultimately we chose Neolith Carrara. It was by far the closest look to marble I could find and is practically bullet proof..but there is nothing like the look of real marble.
We are now starting our master bathroom remodel and back to the marble question. 🧐. We will probably use it on the counters.
We installed Miele appliances . There is a little learning curve but they are excellent. We love our Sub Zero refrigerator. We did gulp at the price but it is sensational.
Thanks for all your great advice Si!
Kimberly
I think we were separated at birth. So many of your tips are ones I would also give. I love the tactile feel of marble but don’t give a hoot about the etchmarks that crop up. I wish I had splurged on the double-thick marble because I love how yours looks. (Mine is called Vermont Danby. It’s the same marble that the Lincoln Memorial is built of. White with smears of gray and gold). Completely agree about the under counter lighting—I wouldn’t spend money on it again. And a sink big enough for sheet pans (and oven racks!) is the smartest thing I’ve ever done. My only regret? I wish I’d sprung for the induction range. Or the combo induction/gas range you see nowadays. My girlfriend has induction, and it is the most refined heat control I’ve ever used. And clean up is like wiping off a mirror. Dreamy!!
Si Foster
Kimberly,
I’m sure we WERE separated at birth! It looks like we made many of the same design decisions. Thank you for your comments and thanks for reading ABK!
xo,
Si