Finally! A sourdough bread recipe that is manageable for bakers of all levels. If you have a few minutes in the evening and a few minutes in the morning, you can make this recipe. Our Easy Everyday Sourdough Bread recipe is perfect for a beginning sourdough baker, to a person (like me) who has years of baking experience!

The sourdough craze began years before many of us dipped our toe in the sourdough pool. Although many people started making sourdough bread in 2020, this movement started long ago in the U.S. French bakers introduced sourdough to the miners in California during the gold rush in the mid 1800’s, back when yeast was difficult to obtain. Sourdough has been famous in San Francisco for as long as I can remember! I recall buying a loaf of bread with my mom back in the 70’s, when we visited California, and taking bread home to make the most delicious toast.
My sourdough journey
I made starter and experimented my way through bags and bags of flour while living in Spain during the height of the pandemic in 2020. My sourdough making days were put on the shelf for a while when we returned home in July of 2021, and then I started making bread again during the long, cold winter of 2022/23.
I’ve tested and developed what I believe is an easy method that yields an amazingly delicious loaf of Easy Everyday Sourdough Bread using just flour, water and salt. I think you will love the way this recipe adjusts to YOUR schedule. Before we get started, here are a few things I have learned along the way…
Tips for making easy everyday sourdough bread
- Do not be intimidated! An abundance of information is available online regarding sourdough baking including: blog posts, videos, courses, social media, etc. You will see the “right way”, or the only way, or the “best way” to make sourdough bread. I believe the best way is what works for you. Breadmaking is not a precise art. It’s something you learn to do by touch, feel and simply doing. Don’t get discouraged. If you fail at making bread a time or two, you are not a failure! Just keep trying. Make adjustments. Follow your instincts and be willing to experiment.
- Use a scale. I have made sourdough with and without a scale. I recommend using a scale. You will save yourself many frustrating moments if weighing ingredients for this recipe! I like this scale and this scale.
- Keep your house warm. 72-78 provides a warm, but not too warm temperature for starter and bread dough to thrive. The temperature of the room is extremely important. I like to use my oven (with just the light on) to keep my starter and dough warm. Keep the starter and dough toward the front and not the back of the oven where it may get too hot. Cracking the oven door will prevent the temperature from rising too much. The microwave also works as a good place to keep starter and dough warm. To use the microwave as a warmer, heat a cup of water in the microwave for one minute. When done, place the starter or the dough inside the microwave and shut the door. You have now created a perfect environment for your sourdough starter to thrive. Kind of like your own little mini proofing oven! The temperature will cool as the water and inside of microwave cools, but this is an easy, no-cost solution. If you are interested in investing in a proofing oven for dough and starter, this small appliance receives excellent reviews and I have heard from friends they cannot live with out it!
- If using starter (at least once) every other day, leave it out on the counter and feed about 4-6 hours before using. If waiting more than a couple days to bake bread, place a lid on your starter and refrigerate. See my starter post for all things starter related.
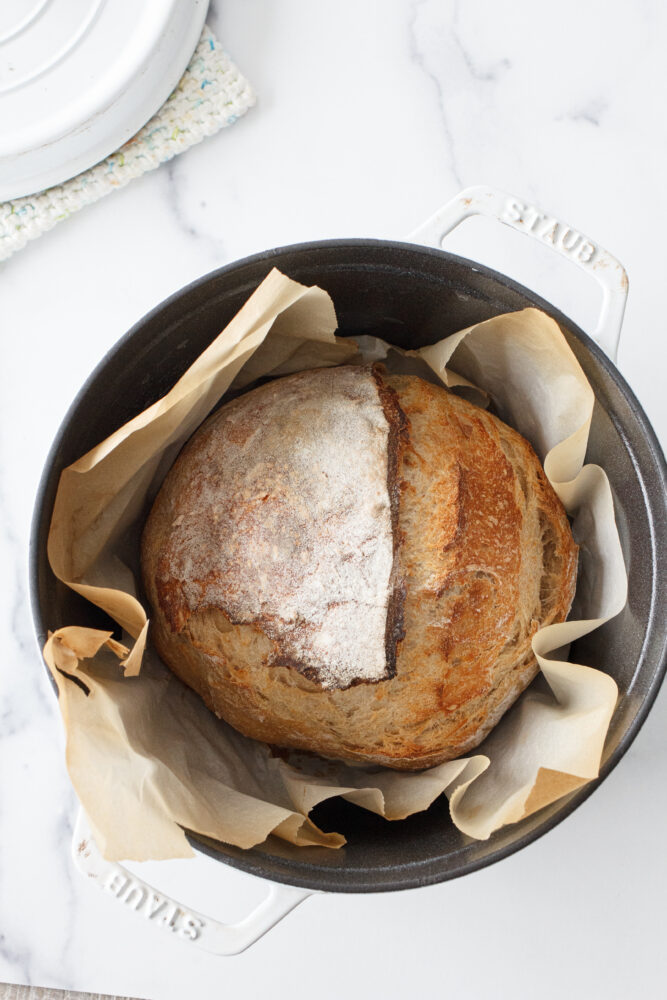
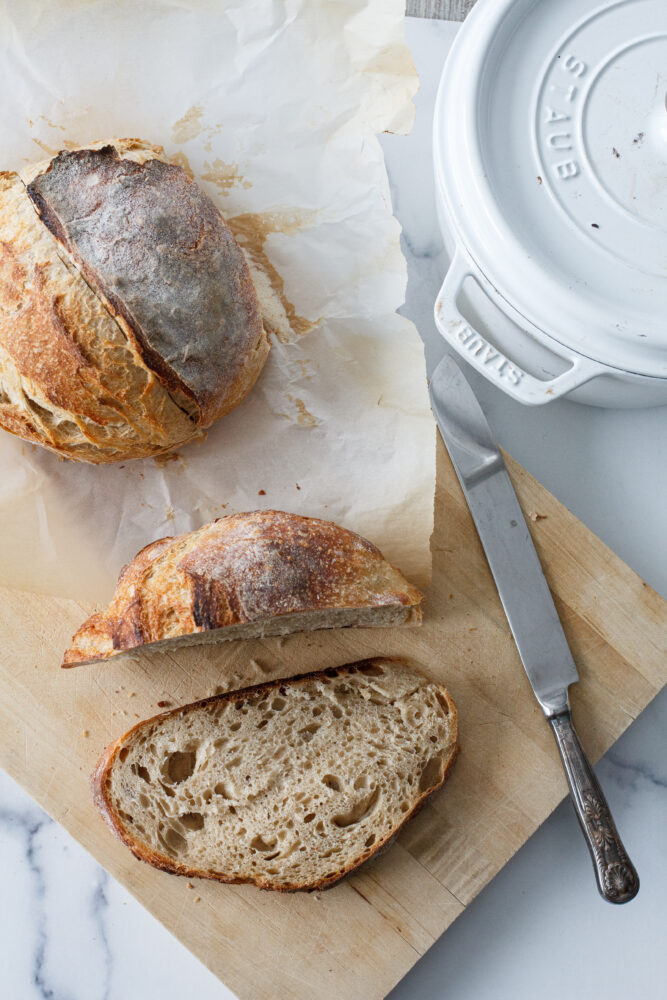
- A dutch oven is best for baking sourdough bread. When we lived in Spain, I didn’t have access to a dutch oven, so I baked in a loaf pan and also a deep baking dish without a lid. I highly recommend a dutch oven. My favorite is the Staub 5 quart tall, because I like the size. It is more narrow and keeps my loaf from spreading too much. I have also used a Martha Steward dutch oven, and my Le Creuset Duth oven as well. If investing in a heavy pan is not possible, ask your mom, grandmother or a neighbor if you can borrow a dutch oven. Check discount stores such as Homegoods, Ross, thrift stores or garage sales as well. I bought my Staub at Orson Gygi in SLC, they have sales occasionally.
- A Banneton is not necessary, but nice to have! I like this brand that comes in a set of two bread proofing baskets, with covers included.
- I like to use these plastic covers (disposable), but I use them a few times before tossing. And these silicone scrapers make cleanup about 100x easier.
- My favorite brand of bread flour is King Arthur, which you can purchase at almost any grocery store. I have also used Lehi Mills bread flour with success.
Steps for making sourdough bread
I’ve created a simple baking schedule which gives a rough estimate or timeline for making bread. This schedule assumes you have starter ready to use (or in refrigerator). Our baking schedule can be adjusted to start in the morning as well, and baked the next day, in the morning or afternoon!
Baking schedule for easy sourdough bread
- 24 hours before making dough, bring starter to room temp, feed 2-3 times
- 5 pm: mix dough, let sit for 15-60 minutes
- 6 pm: 4 stretch and fold wait 30-45 mins between
- 9 pm: shape the dough into a round ball about 6 inches in diameter. Place in bowl or banneton, cover and refrigerate overnight
- 7 am: remove dough from the fridge. Score and let sit uncovered for 1 hour.
- 8 am: place dough in oven, bake for one hour total
- 9 am: remove from oven and let cool for 1 hour before slicing
Try, try, again
Making sourdough bread requires a few ingredients and the willingness to experiment a bit. When I started making sourdough in Spain, I had a system that worked for our humid kitchen at sea level. The oven was small, and as I mentioned earlier, a Dutch oven was not available. So, I made do with what I had. When I returned home, the recipe I used in Spain did not work in my desert (dry) environment and altitude of close to 5000 ft above sea level. I realized it would require adjustments and experimenting until I found a method and recipe that worked at home.
After months and over 125 lbs of bread flour, I have a recipe I feel confident about sharing with you. I had coaching from my friends Wendi and Btittny (THANK YOU both!), read books, watched videos and spent countless hours baking. I’d love to hear any feedback about this easy everyday sourdough recipe and method in the comments below. Happy baking my friends!
Helpful termonology
Levian or starter: Water and flour mixture used in place of yeast. This is what makes sourdough bread rise.
Autolyse: a mixture of flour and water only which sits for a period of time to allow flour to best absorb water. Note: A “true” autolyse combines only flour and water. I add the starter as well because I don’t see much of a difference when I wait to add the starter.
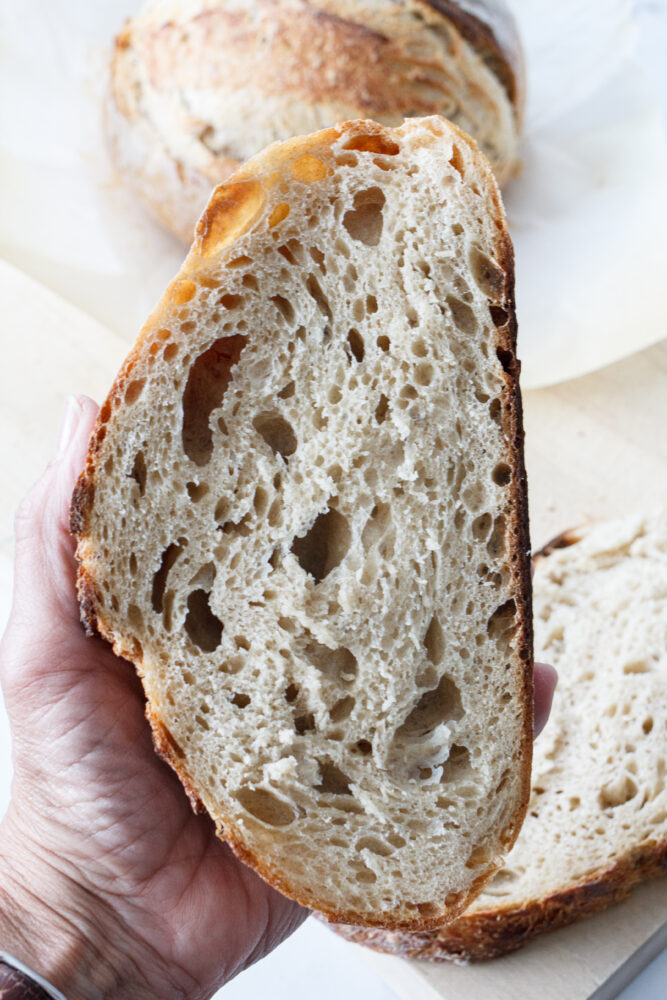
Bulk fermentation: Period of time the dough is allowed to rest. It is the first rise of the bread before it is divided or shaped. Stretch and folds of the dough are usually done during the bulk fermentation time.
Banneton: bowl made of rattan or wood, usually sold with a cover, in a round or oval shape.
Dutch oven: a pan made of cast iron or enameled cast iron with a lid.
Lame- (lahm) is a long, thin stick that holds a razor used to score bread dough. The cut helps to control where the bread splits as it bakes.
Easy Every Day Sourdough Bread

Ingredients
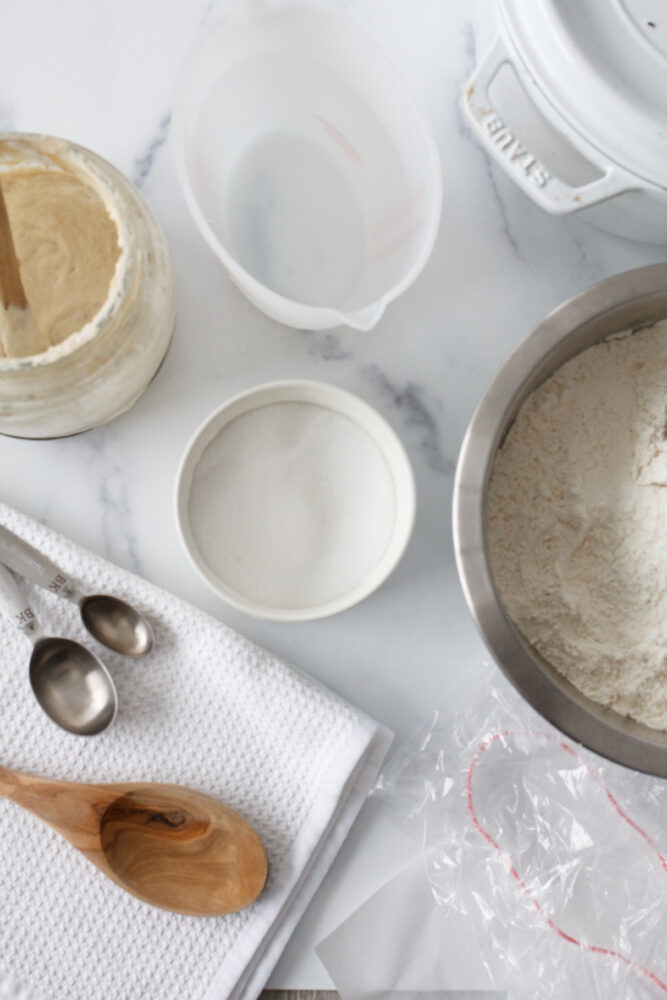
- 80 grams starter
- 270 grams warm water – about 1 ¼ cup
- 400 grams bread flour
- 12 grams salt about 1 1/2 teaspoons
Instructions
make dough + autolyse
- Turn on the scale and set to grams.
- Place a medium size (3 quart) bowl onto the scale. Zero-out or “tare” the scale to zero.
- Spoon or pour 80 grams of starter into the bowl. Zero-out scale.
- Add 270 grams of warm (90-100 degrees) water to the bowl.
- Zero-out scale.
- Add 400 grams of bread flour and 12 grams of salt to the bowl, mix with dough hook, spatula or clean hands.
- The dough will be rough and shaggy at this stage. Mix any loose bits of flour in the bottom of the bowl into the dough, and scrape down the sides of the bowl to avoid hard bits of dough forming.
- Set the timer and let the mixture sit for one hour, covered in a warm room, 72-78 degrees. This step allows the flour to absorb the water and starter.
- *If short on time, this step can be done in 15 minutes. Mix the starter, water, starter and salt together in a bowl. Let sit for 15 minutes, then proceed with stretch and fold.
bulk fermentation, stretch and fold
- If your room is cool or below 75 degrees, set the dough in a warm place while in the bulk fermentation phase for the next 3 hours.
- Dip fingers into a bowl of water or run under a faucet to prevent fingers from sticking to dough. Place fingers on the edge of the dough, pull a portion of the dough upward about 4-6 inches, then fold back into the rest of the dough. Turn the bowl a quarter turn and repeat until one total rotation of the bowl is complete. Repeat a second time.
- Cover dough and set aside. Set the timer for 30-45 minutes.
- Repeat the stretch and fold 3 more times, about every 30-45 minutes for a total of 4 stretch and fold over a 2-3 hour period of time. The stretch and fold step strengthens the dough and activates the wheat gluten and should take less than 5 minutes each time it is performed.
- I try to allow 4 hours total from the time I mix the dough, to the time it goes into the refrigerator.
Shape and refrigerate
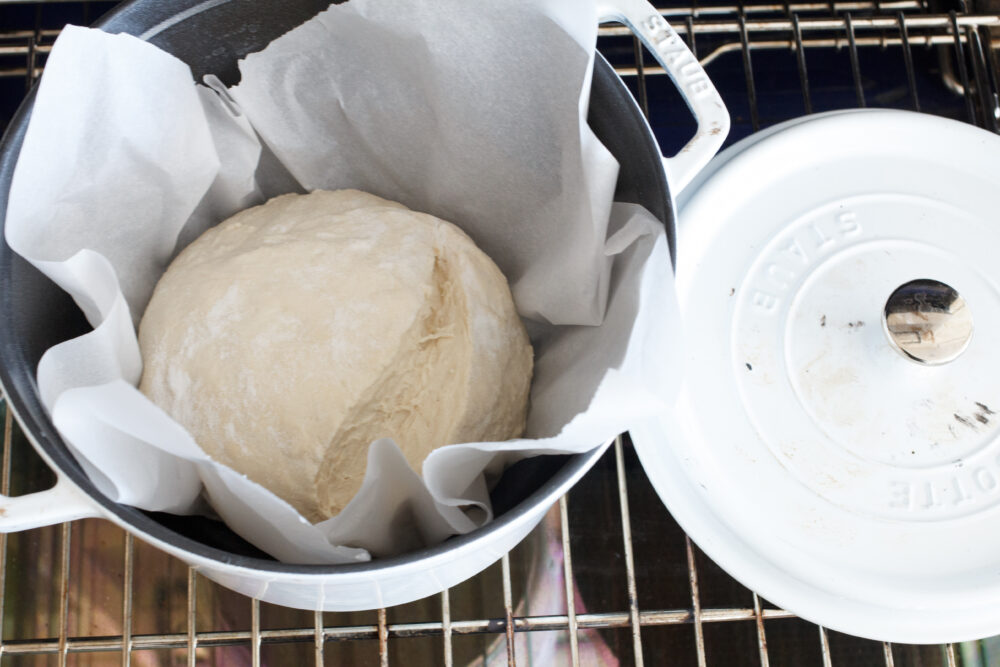
- After the dough has completed bulk fermentation, do one to two more stretch and fold and turn the dough upside down so the bottom (smooth side) of the dough is on top. On a clean surface lightly floured surface, tuck the sides of the dough under until the ball of dough is about 5-6 inches in diameter. Place on a piece of parchment paper in a medium side bowl or banneton, cover and place in the refrigerator. Refrigerate the dough for 6-18 hours. If the dough is placed in a banneton, make sure to cover the bottom of the bowl so the dough is not dried out in the refrigerator.
bake and cool
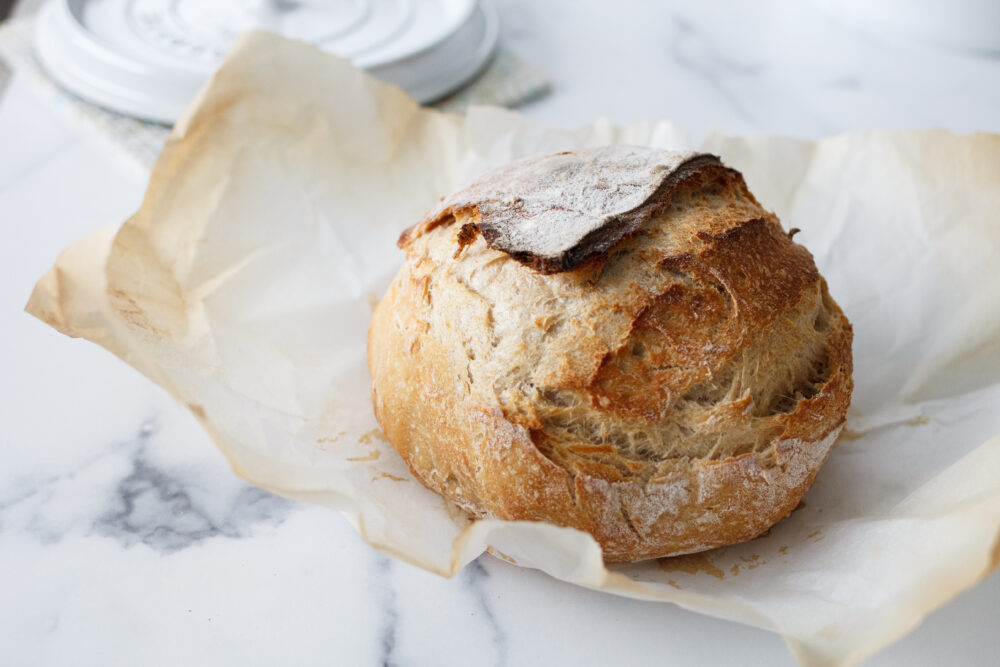
- One to two hours before baking, remove the dough from the refrigerator. Dust the top of the dough with rice flour and using a razor, sharp knife or lame, score the bread one inch into the dough. Let the dough sit on the counter top for 1 hour. I have let the dough sit on the countertop for two hours without a problem.
- Gently lift the dough into the dutch oven, tuck the parchment paper into the pan and place the lid on the pan.
- Set the rack in the middle of the oven and turn the oven to 450 degrees. Place the covered pan in the oven and set the timer to 50 minutes. After 50 minutes, remove the lid from the pan and continue to bake for an additional 10 minutes.
- Remove the pan from the oven and allow the bread to sit in the pan for 5 minutes, then carefully lift the bread out of the dutch oven. Let cool for one hour before slicing.
Notes
- Of the suggested tools needed for making sourdough successfully, I highly recommend a good quality scale and a dutch oven. I’ve linked my preferred brands, but any kitchen store or many departments store will also carry these tools as well.
- If this baking method in this recipe does not work well for you, try preheating the dutch oven for 30 minutes in a 450 degree oven, then place the dough into the dutch oven and cover. Bake for 30 minutes covered, and 15 minutes uncovered. The internal temperature of the bread should be 205-210 degrees.
- I’ve also included a higher hydration amounts in the recipe notes (below). This higher hydration recipe is easier to stretch and fold, but I believe it is a little more difficult to handle and bake without a risk of doughy center.
- Higher hydration recipe: 80 grams starter, 300 grams water, 400 grams bread flour + a little all-purpose flour for shaping on countertop, 12 grams salt.
- If you feel your dough is not rising enough, leave it on the countertop, covered for 6-8 hours before refrigeration. Everyone’s kitchen, water, flour, etc varies a bit. Some days I leave my dough on the countertop overnight. When I do this, I refrigerate for at least an hour before baking.
- If your water is chlorinated, use bottled or filtered water in your starter. I have not had an issue using tap water in the US in sourdough bread, but have had problems with growing starter using tap water in some locations. To remove chlorine, boil water for 5 minutes then let cool completely or let water sit in a pitcher for a full 24 hours (chlorine will evaporate) or simply use bottled water.
Equipment
- Kitchen scale
- Measuring cups
- Bowl medium, narrow or deep
- Cover for bowl (plastic or cloth)
- Dutch oven or cast iron pan with lid
- parchment paper
- Sharp knife or bread lame
- Banneton
- Bread Knife
Did you make this recipe?
Be sure to leave a comment and rate this recipe! I’d love to see a photo, tag @abountifulkitchen on Instagram!
Nairy Flores
Do I have to put it in the fridge or can I let it sit out for a few hours and then bake?
Jillian
Hello friend!
We recommend following the recipe for best results; however, letting it sit out on for a few hours will not do any harm. The fridge slows yeast activity, and allows bacteria to develop more complex, sour flavors.
Happy baking!
Jillian
ABK Team
Scott
Do you have a recipe for sour dough that uses some whole wheat flour? I love this recipe and would love to try a whole wheat version but I don’t know the ratio of water to white flour to wheat flour.
Jillian
Hi Scott!
We do not currently have a recipe with whole wheat bread in the sour dough. However, you can definitely try this recipe the way it is and see if you like it! You could also try adding wheat flour and seeing what that does.
Best of luck!
Jillian
ABK Team
Cindy
Absolutely delighted with the results of your recipe! I followed it faithfully and I just finished baking it in my Instant Pot, I firstly started out with your recipe but when it had completed the time in the fridge I allowed it to slowly rise on the sous vide level for 1 hour at 40’c. Then baked it for 40 minutes on 55’c and then turned it out upside down for last 20 minutes on 65’c. 95’c inside at the end. Light fluffy inside and crispy crust. Thank you very much!!
Jillian
Hi Cindy!
We are so happy to hear your results! It sounds like it was a success for you. Thank you for your comment, we are delighted that it turned out well!
Happy Baking,
Jillian
ABK Team
Amie
If you don’t have a scale, I’ve found that you can do 1/2 cup of starter, 3 + 1/3 cups flour, and 1 + 1/4 cup water without any issues!
Jillian
Hello Amie!
Thank you for the great recommendation I’m sure that will be very useful and helpful for those who don’t have a scale!
Best,
Jillian
ABK Team
Jennifer
I’ve been making your recipe for several months and while reading the directions for the umpteenth time today, just realized that you do not say to preheat the oven. Do you preheat it? Or just set it at 450 and put the pan in directly? Thanks!
Jillian
Hi Jennifer!
In this recipe you will preheat the oven.
Happy cooking!
Jillian @ABK Team
Julie Johnson
Do you use starter or levain?
Jillian
Hi Julie!
Yes. Si has a really great sourdough starter recipe that you can try too!
https://abountifulkitchen.com/easy-sourdough-starter/
Best,
Jillian @ABK Team
Jillian
Here is the recipe link! https://abountifulkitchen.com/easy-sourdough-starter/
Si Foster
Hi Julie! I use the starter when making the sourdough bread. Let me know how it goes! Thanks for reading ABK!
XO
Si
Hannah
This is my first time making sourdough. I don’t think it worked quite right and I’m not sure why. I followed all the steps and it didn’t raise at all…. Our house is cold but I left it in the oven for all the fermentation. I just got it out of the fridge and scored it and it just doesn’t look ready to bake. What can I do to improve it next time? Or to salvage it right now?
Tracey
Just so you know, it’s not necessary to let the dough sit at room temp for an hour or two after removing from the fridge and before baking. I preheat my oven, take my dough straight from the fridge, remove from banneton, score and put it right into the oven! Been doing it for years and works like a charm! 🙌🏻
Si Foster
Hi Tracey!
Thank you for the recommendation.
XO,
Si
Joyce
Can I use all-purpose flour or does it have to be bread flour?
Si Foster
Hi Joyce!
All purpose flour will work great!
XO,
Si
Sabrina Petersen
A couple years ago I asked a friend to share her Alaskan Gold Rush starter with me, (which I ignored) and it actually turned black in my fridge. About a month ago I saw the black starter in my fridge and thought to myself, “seriously?!?” That same day you posted your “Easy Sourdough Recipe” and I poured that black stuff off, fed that starter and baked my first loaf and have made it several times since then. It is so easy and so yummy!! I did have a problem with the bottom of the bread burning, so to solve the problem I simply reduced the heat and turned the convection oven on. Thanks for teaching me something new!
Si Foster
Sabrina, I am so glad you could get the starter active and some bread baking. Thank you for sharing your positive feedback!
XO
Si
Dee
Hi,
Have you ever tried making sourdough bread using a bread maker?
I understand that many traditional sourdough bakers will throw up their hands in horror at the thought! But, for those who are busy and/or don’t want the long process, but who love the flavour of sourdough bread, it’s a game changer.
I put my ingredients in the bread maker in the evening and put it on the dough cycle. As our house is quite cool I leave it in there overnight, but you could start the process in the morning and do the same thing through the day when you can keep an eye on it rising. Then the next morning I either deflate it and put it in a bread tin to rise for 2-3 hours before cooking or just leave it in the bread maker and start the cook only cycle with the crust colour set on dark. An hour later you have a delicious loaf of sourdough bread.
Happy baking.
Si Foster
Dee,
Thank you so much for the detailed instructions using a bread maker! I have never used one, but am often asked if my recipes will work in a bread maker. This comment will be helpful for others who want to go the bread maker route!
many thanks,
Si
Jana
What adjustments, if any, need to be made for low altitude or sea level?
Si Foster
Hi Jana, no adjustments are needed for low altitude/sea level. Let me know how it goes for you! Thanks for reading ABK.
XO
Si
Melissa
This was ny first sourdough recipe I ever used my starter on and it worked like a charm.
Si Foster
Melissa! So glad that this recipe worked out well for you. There is nothing like successfully making some sourdough bread. Thank you for reading ABK
XO
Si
Barbara
This is my go to recipe, I make this bread every week and my family loves it. It truly is an easy everyday sourdough bread. I love how she lists the time line and has great information for making the bread. I tend to bake it a bit longer, my husband likes it a bit crispy. THANK YOU!!
Si Foster
Barbara, I am glad that you found the timeline helpful and are enjoying this recipe. Thank you for reading ABK!
XO
Si
Amy P
Is this sour? I like natural yeast but can’t handle sour bread. Is there a way to make this donuts not sour? Thanks for your help!